Rainbow Spiderweb Quilt Top

Rainbow Spiderweb Quilt Top - Hooray for Rain

About a year ago, I picked out a rainbow stack of solid fabric that matched Ann Kelle’s Remix Hearts. I adore the Remix Hearts print because it makes me think of my 80’s childhood. I made big plans for my rainbow fabric stack, and those plans are almost complete! My big plans included three quilts.

First, I finished a stripey baby quilt.  

Stripey Twin Quilts - Hooray for Rain

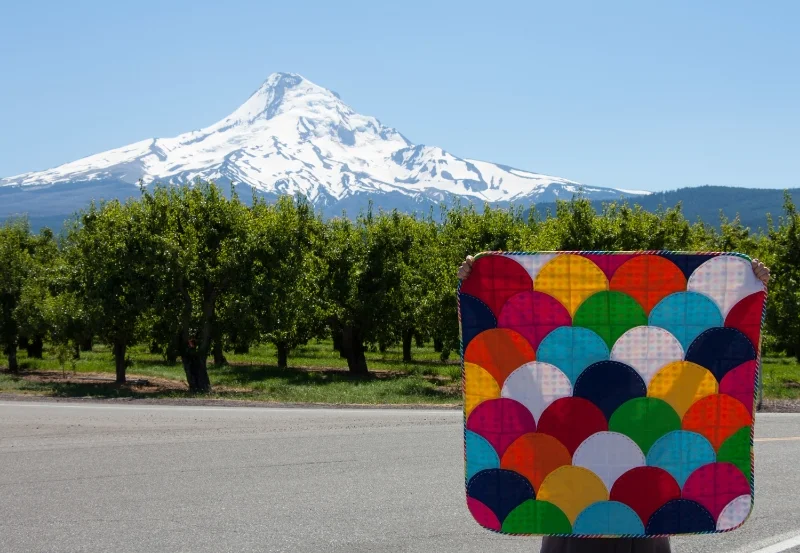
Next, I finished my Ample Curves Quilt. 

Ample Curves Quilt - Hooray for Rain

The scallop quilt left me with some useful scraps. I used the Accuquilt Drunkard’s Path die to cut the scallop units. To get a quarter-scallop block using the Drunkard’s Path die, you trim the concave fabric to a quarter inch after piecing the block, leaving two scraps of fabric that are about one and three-quarter inches by 7 inches, and one and one-quarter inches by 6 inches.

Drunkard's Path Block Pieces - Hooray for Rain

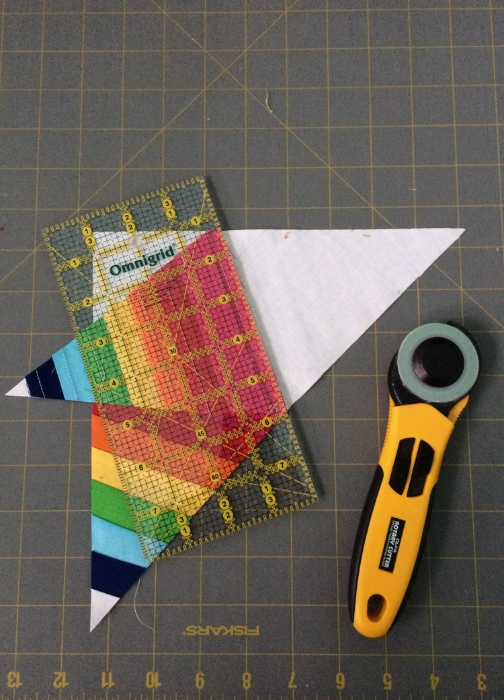
I realized that I was going to have a lot of scrappy little strips left over, and decided that it was the perfect opportunity to try out the beautiful spiderweb block.  As it turns out, my friends, the spiderweb block is a serious scrap buster!

Rainbow Spiderweb Quilt Block - Hooray for Rain

When I finished Ample Curves, I had about 132 strips collected. I trimmed all the strips to one and one-quarter inch wide. Each of these spiderweb blocks used up a whopping 64 strips!

As you might guess, I had enough strips for exactly two blocks. I loved the way they looked, and I wanted to make more. I scrounged through the rest of my scraps from my initial rainbow fabric stack, and found enough leftovers to make a total of nine blocks.

I used House of a la Mode’s excellent tutorial to make my blocks.

Rainbow Spiderweb Blocks - Hooray for Rain
Rainbow Spiderweb Quilt - Hooray for Rain
Rainbow Spiderweb Blocks - Hooray for Rain

There was even a double rainbow while I was piecing the blocks!

Rainbow - Hooray for Rain

All nine blocks are now sewn together, and looking pretty bright and cheerful!  

Rainbow Spiderweb Quilt Top - Hooray for Rain

Now, I struggle with what to do for the border. As I was piecing the blocks, I was thinking that I might do a gray border. However, once the blocks were put together, my immediate thought was that a white border would be perfect. I will likely end up going with the white border.

However, the spiderweb blocks have yielded more scraps! So I’m left wondering, what is the best use for these scraps?

Rainbow Spiderweb Quilt Scraps - Hooray for Rain

Should I trim some of them to one and one-quarter inch and place rainbow strips floating in the middle of the white border? Many of the strips would lack pink, red, and possibly orange when trimmed to that width, but at least a few would contain the full spectrum of colors.

Rainbow Spiderweb Block - Hooray for Rain

Or should I save all of the scraps and make some sort of improvised fractured rainbow - a fourth quilt in this series?

What kind of border would you put on this quilt?

Toilet Paper Tube Snowmen

Last year, after I made my Fabric Christmas Lights, I wanted a project to use up my scraps.  I was also hoping to find something to replace the Thanksgiving Toilet Paper Tube friends I had been using as decorations at work. I was happy to find the tutorial for these darling Toilet Paper Tube snowmen at Crafts by Amanda and set out to re-create them.

You'll need paper, pens or colored pencils (black, orange, and pink), small pom poms, pipe cleaners, scissors, fabric scraps, buttons, and a hot glue gun. For the buttons, I was lucky to have a large collection to choose from. My mom has an antique tin full of buttons collected over the last 40+ years, mostly from outfits that came with a spare. Digging through the collection was like visiting a fashion museum!

My 5 year old cousin T. loved playing with these snowmen over Christmas. I'm planning to make her pink and purple snow friends, per her request, for a mail surprise this month. If you have kids in your life, consider making them a snowman the next time you throw out an empty toilet paper roll!

Blue Hawaiian Anniversary Quilt

Hawaiian Anniversary Quilt - Hooray for Rain

Hello friends! Happy New Year!

As Lauren mentioned in her last post, our parents celebrated their 40th anniversary in December. I would post a picture of them here, but Dad is too camera shy. You’ll have to settle for pictures of the anniversary quilt I made for them. It occurred to me about a year and a half ago that while I had made quilts for Lauren and many other family and friends, I’d never made one for the people who raised me, loved me, supported all my aspirations, and bought me my sewing machine!

It was time to remedy that. I thought long and hard about what kind of quilt would be meaningful and what kind of design would compliment their tastes. I settled on a Hawaiian quilt because Mom and Dad honeymooned in Hawaii, and we’ve had several memorable family vacations there. Also, Hawaiian quilts usually consist of only two fabric colors, which I thought would suit the somewhat minimalistic design tendencies of their home. The majority of their walls are white, so I chose white for the background, with navy blue for the quilting design and binding.

Next it was time to pick a pattern. I selected Holiday Heleconia by Poakalani Hawaiian Quilt Patterns. The pattern comes with detailed instructions. The basics are that you first trace the pattern onto freezer paper.

Hawaiian Quilt Pattern - Hooray for Rain

Next, you carefully fold your fabric into eighths, much like making a paper snowflake. The pattern is wedge-shaped, as is your fabric when folded correctly. The pattern is then traced on to the top layer of your fabric wedge, and then you carefully cut the pattern out through all the layers at once.

Next, you unfold your fabric and carefully lay it out and pin it to your background fabric.

Hawaiian Quilt - Hooray for Rain

Then you thread baste all the way around. At this point you can remove your pins, hooray! Then, you needle-turn applique the edges using your thread baste lines as your guides.

Thread Basting - Hooray for Rain

This wasn’t my first trip to the applique rodeo, but it still took a good long while (read: months of intermittent applique) to finish. It was incredibly satisfying to pull out all of the basting threads when I finished! My celebration was short-lived though, because this was the point where the REAL work began. Hawaiian quilts are traditionally hand-quilted. Hand-quilting was the part of this quilt that made me nervous. Last summer, in preparation for this quilt, I learned how to hand-quilt with chunky perle cotton on my Ample Curves quilt. I gained a bit of experience and confidence from doing so, but I was still a hand quilting newbie when I started quilting the Blue Hawaiian. I had to accept that it wouldn’t be perfect, and that I had to start somewhere to get better. So, I spray basted the batting and the backing to my appliqued quilt top, and got to work. Here's a shot of the back of the quilt while I was in the middle of the hand-quilting.

Hawaiian Quilt - Hooray for Rain

After completing this quilt, I don’t think I can get away with claiming I am a hand quilting beginner anymore, but I have a long way to go before I can squeeze 12 stitches into each inch like the amazing Amish quilters!

Luckily, if anyone will love your big sloppy stitches, it’s your parents. I finished Blue Hawaiian on their anniversary, and gave it to them on Christmas Eve. It felt really good to surprise them with a quilt. There’s a lot of things I’d do differently if I made another Hawaiian quilt but I’m happy with the overall effect.

Hawaiian Quilt - Hooray for Rain

Here's a shot of the back of the quilt.

Back of Hawaiian Quilt - Hooray for Rain

Blue Hawaiian is hanging proudly on my parents’ wall, and I am happy to be diving into new projects!

Hooray for Rain


Ringing in the New Year

Can you believe it's almost 2015!? I'm really looking forward to having a shiny new year with unlimited opportunities and adventures.

New Year's Eve is all about sparkle. I've found some really beautiful Washi tape on my recent craft store shopping trips, and fell in love with this graphic and shimmery pattern. It inspired me to make a banner to ring in the new year.

Supplies: Glittery Baker's twine, Washi tape, sticker letters, and a 1 inch ruffled punch

Just like everyone else, I was busy this holiday season baking, wrapping, and also had an extra few projects working with Jen on festivities for our parents' 4oth Anniversary.  I didn't get to making and sending Christmas cards like I had hoped. I was contemplating a number of labor-intensive designs for New Year's greetings, when Jen surprised me with a Silhouette Cameo for Christmas. It will cut out any shape from vinyl, paper, or canvas, and draw shapes or letters with every color you could dream of. This amazing piece of equipment will make my life so much easier in 2015 and seems to do just about everything except fly to Mars.  Here are my first few attempts...

Wishing you a joyful and bright 2015! What are you doing New Year's, New Year's Eve?

Winter Solstice Brew

Winter Solstice Brew - Hooray for Rain

By the time the Winter Solstice comes, we're deep into December. The days are short and what little light we receive is muted and distant. Now more than ever, there is so much more to do than hours in the day. There's baking and shopping and wrapping and making of surprises for the ones we love. And we still must do all the activities of normal life that refuse to be ignored for an entire holiday season.

My cravings for comfort are stronger than ever. I don't want to leave my flannel duvet cover and coziest pajamas in the morning. I want soup for every meal. Tea before sunup, and after sundown. Hot chocolate. Anything that will warm you, either from the outside in, or from the inside out. 

Last December, I pulled out my beloved copy of jam it, pickle it, cure it to make marshmallows for hot chocolate. As I paged through the cookbook, I was reminded of another recipe that I'd always wanted to make, but never gotten the timing quite right. The recipe was for Winter Solstice Brew.

This was one of those recipes that you just know will be good. Brandy spiced with orange, cinnamon, vanilla, anise, and peppercorn. I marked my calendar for late October of this year so that for once I could get the timing right. It took mere minutes to prepare the ingredients, and then five weeks of patience.

The end result was a drink that feels like a cozy sweater for your insides. Sorry if that sounds weird, but it's true! The orange flavor was strongest initially, and the cinnamon lingered pleasantly. It's particularly good in hot apple cider. Treat yourself and your loved ones to the good apple cider in the refrigerated section of the grocery store, if you can.

I had a warm and cozy winter solstice this year, and I hope you did too. Happy holidays!

Winter Solstice Brew

Lightly Adapted from Karen Solomon's recipe in jam it, pickle it, cure it

4 cups brandy
2 star anise
2 cinnamon sticks
2 vanilla beans, sliced lengthwise
3 medium oranges
24 peppercorns

Wash and quarter your oranges, and divide them equally between two clean quart jars. Add one star anise, cinnamon stick, and vanilla bean to each jar. Add twelve peppercorns to each jar. Add two cups of brandy to each jar.

Cap the jars, and shake them once daily for two weeks. After two weeks have elapsed, strain the brandy through a sieve into a measuring cup. Squeeze the juices out of the orange quarters. Bottle the brandy into smaller vessels for gifting, or return to a clean, covered jar. Let the brandy sit for 3 weeks before enjoying.  

Hooray for Rain - Winter Solstice Brew