Fabric Christmas Lights

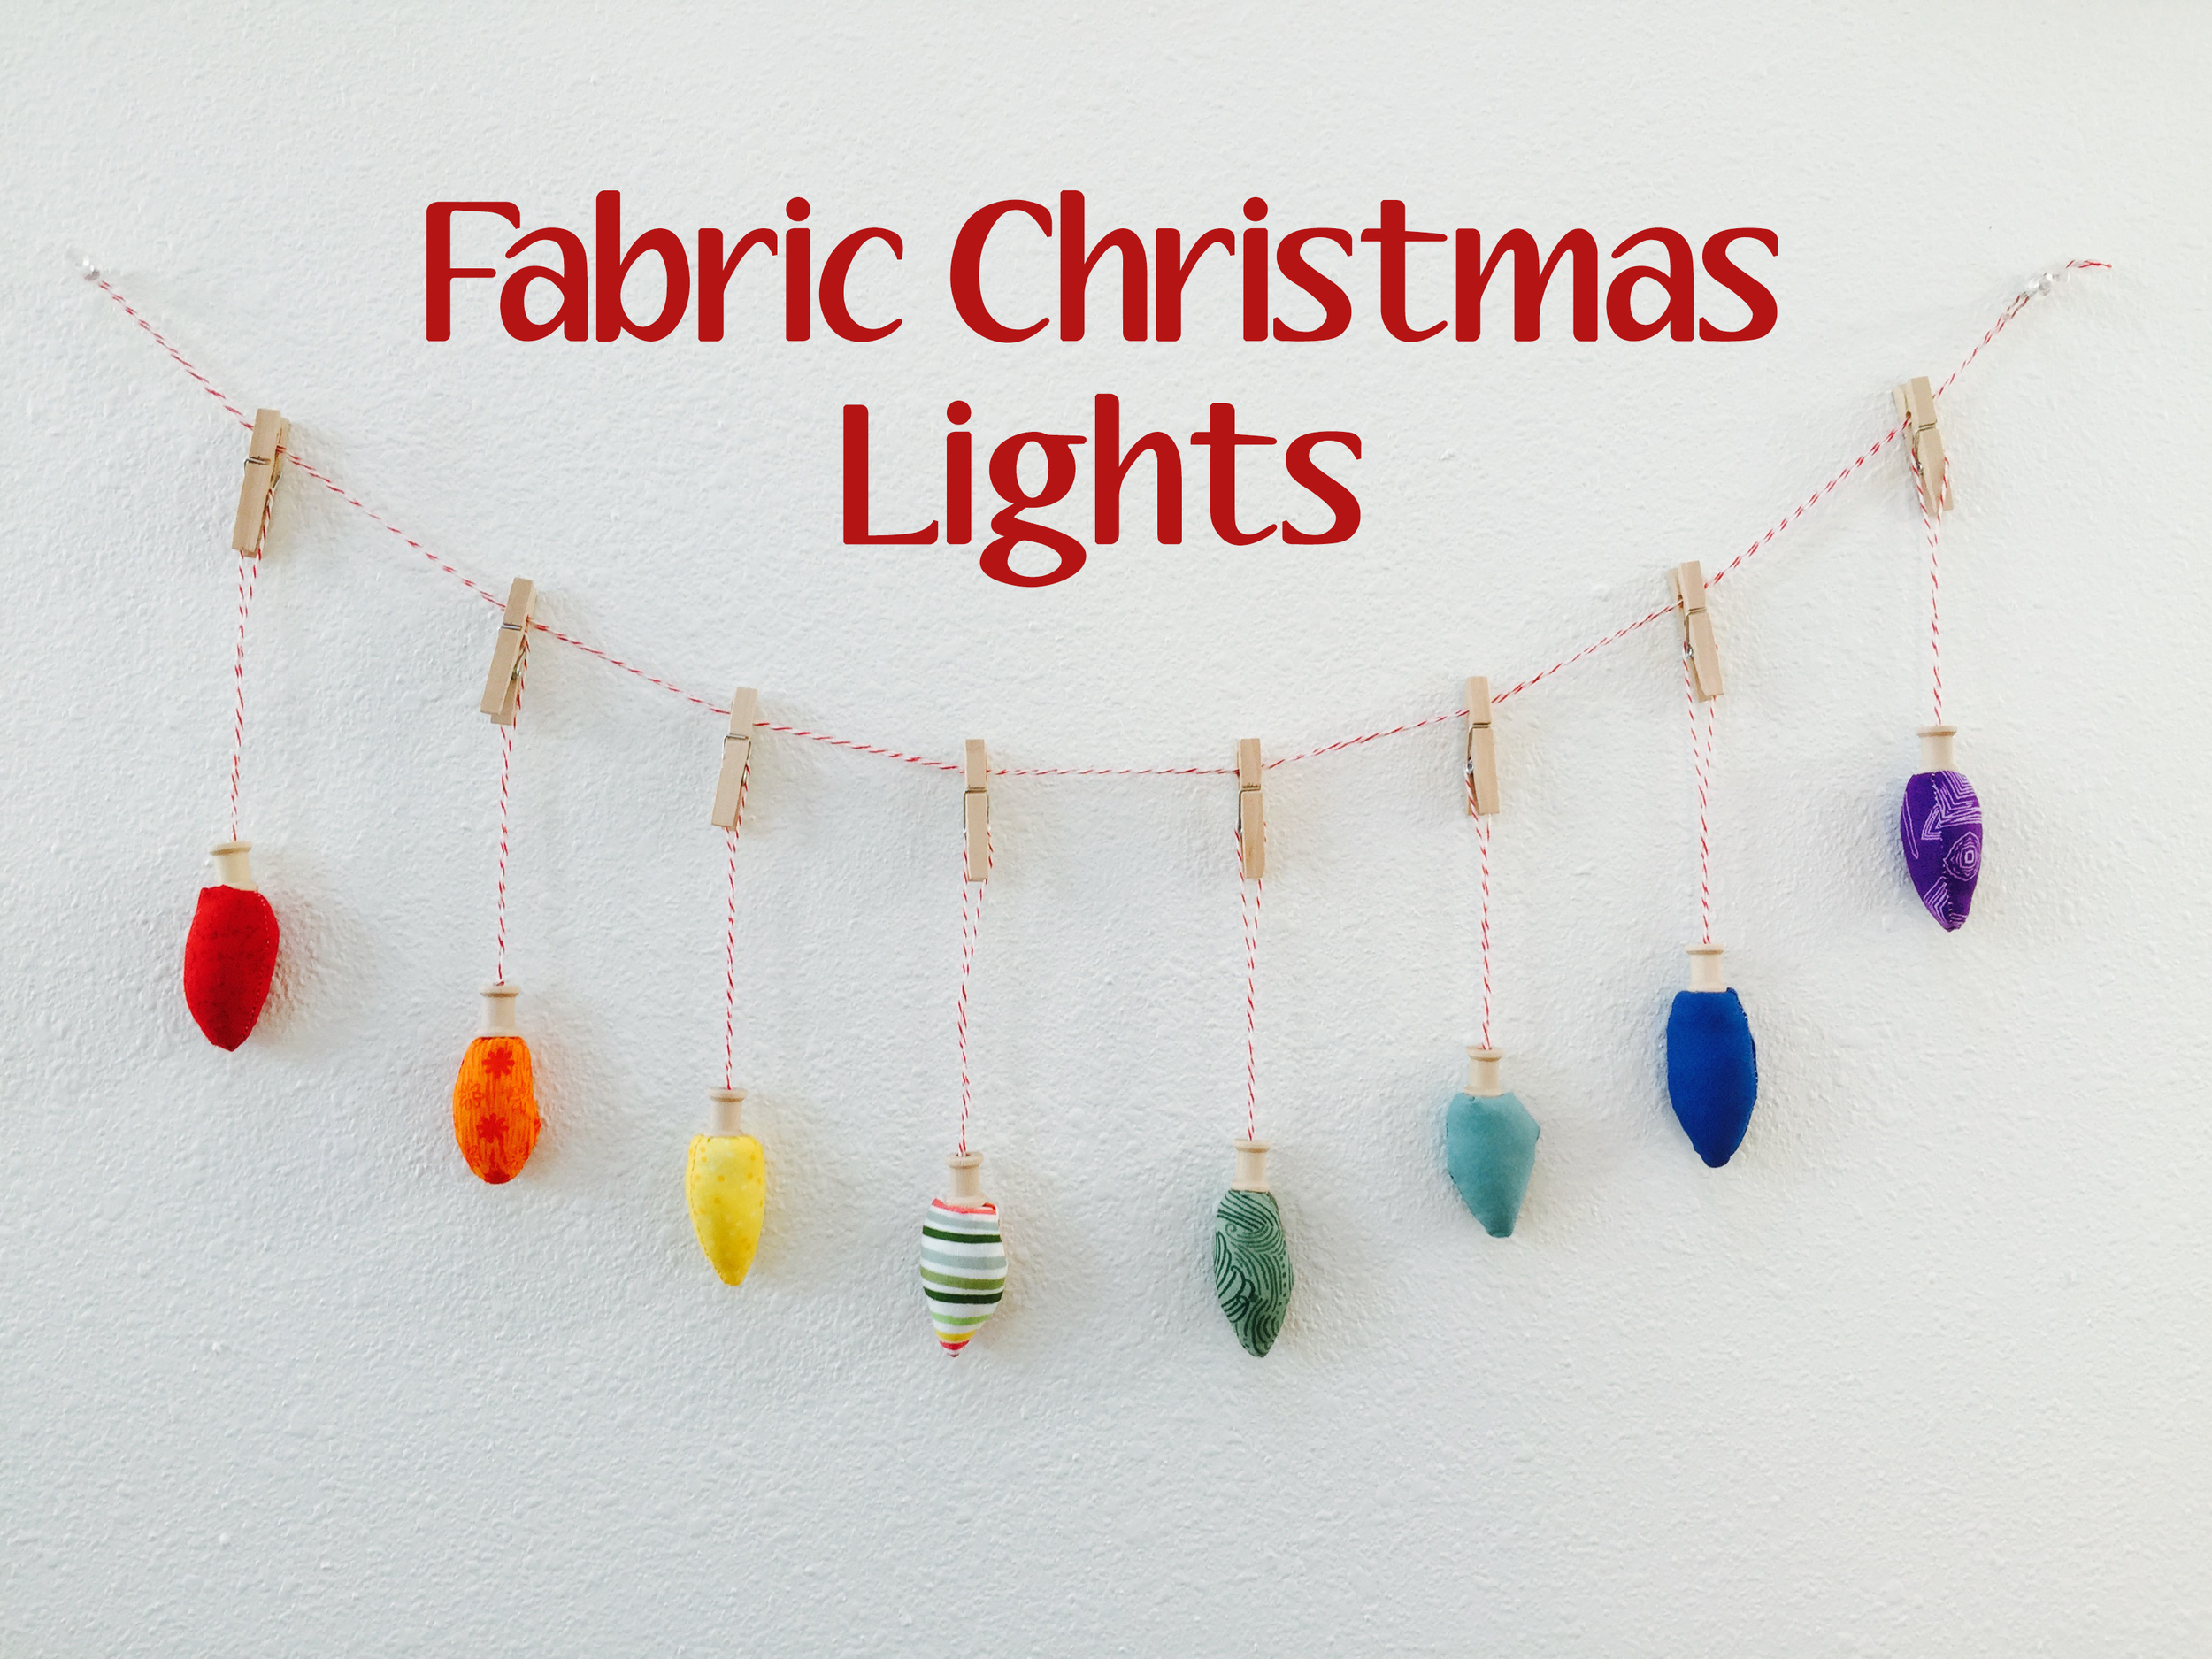
Last year, I found this fabulous tutorial for Retro Fabric Christmas Lights, and couldn't wait to make my own.  I have no sewing experience or talent, which is why I tend to stick to paper crafts. Jen was gracious and patient enough to help me sew the light bulb outlines.

Once each of the lights was sewn, I used a pair of tweezers to fold them back to right side out since the opening was so small. I used a knitting needle to stuff each light bulb with polyfill, and chose not to hand sew each one shut. Instead, I used the eraser end of the pencil to tuck the fabric edges back inside with the polyfill, and hot glued a small bead to seal the stuffing and fabric edges. Before the glue dried, I attached the wooden spool and baker's twine per Erin's instructions in the tutorial.

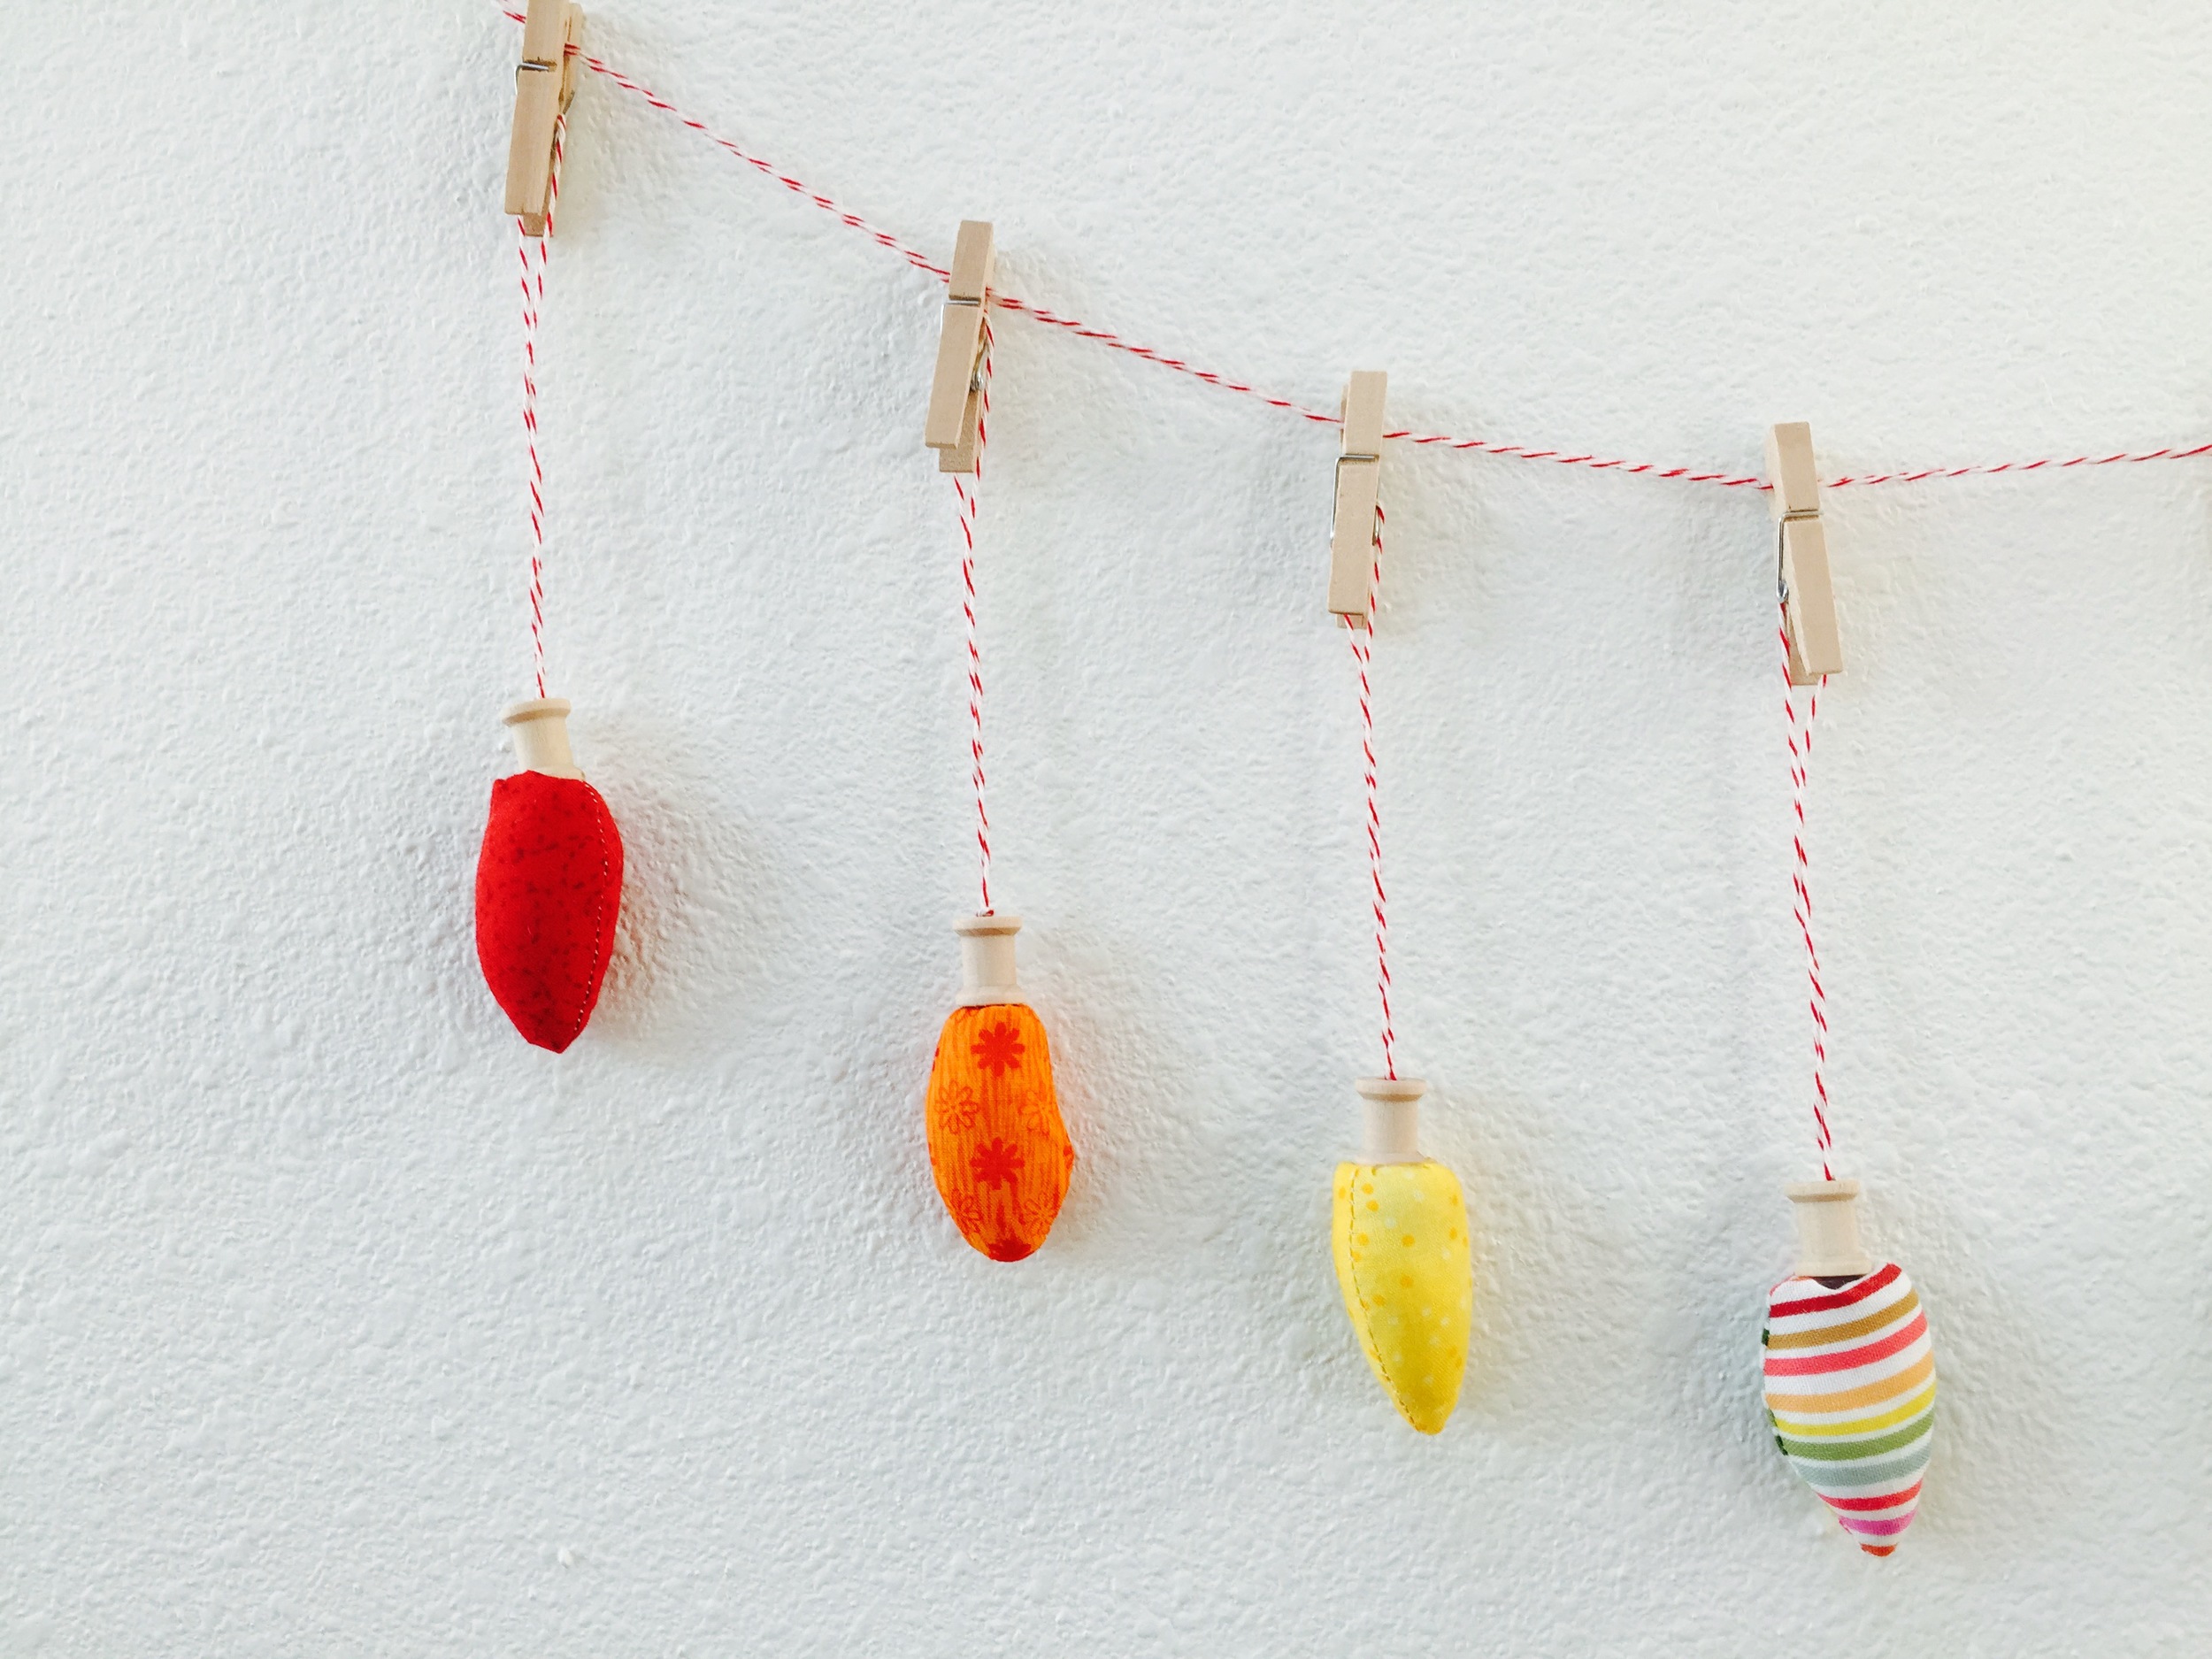
I love that the options for these lights are endless with so many colorful fabrics and baker's twine on the market. The lights are perfect for fabric scraps and are cheerful and useful no matter what pattern you choose. I think it's fabulous that they are so kid-friendly and durable, unlike so many Christmas decorations.

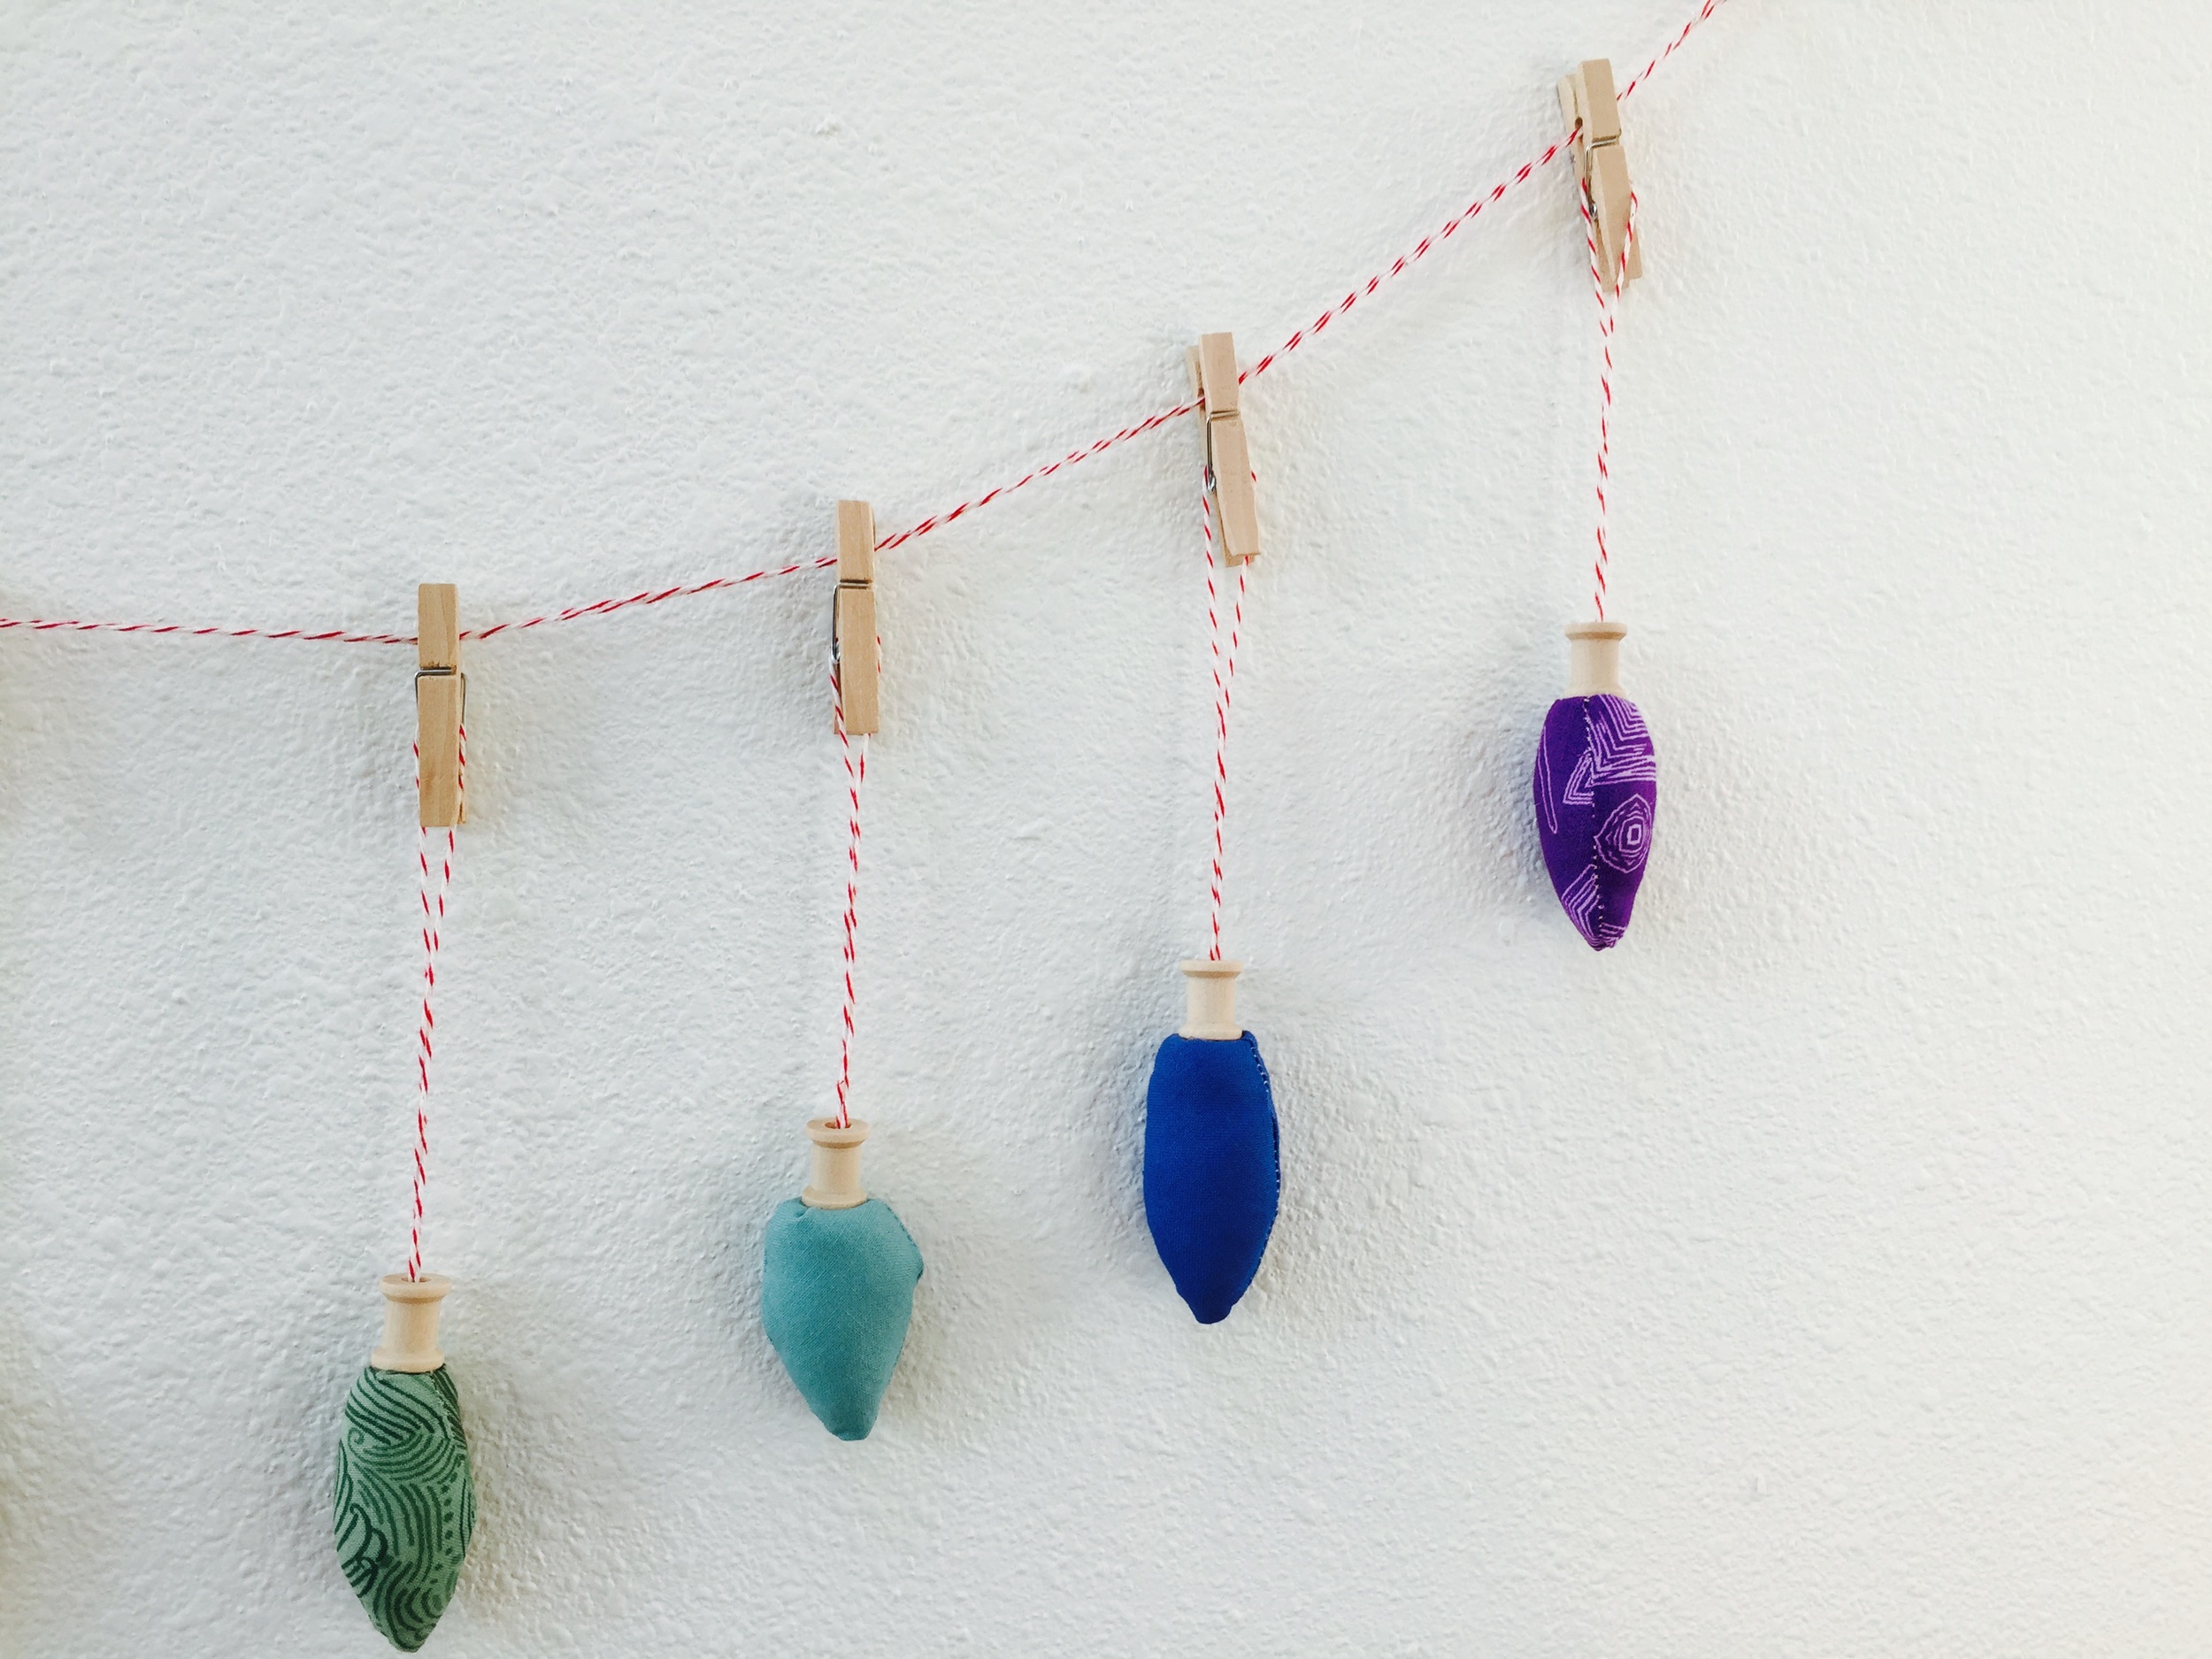
I made a light bulb garland with each light tied on to the baker's twine string in a set pattern, but I also made a few with clothespins so the colors and patterns could be switched out. I tied the leftover lights onto my packages as fun decorations, and to be used as ornaments.

lights10.jpg

Happy Holidays!

The Sweetest Doll Pattern

Hooray for Rain - Sweet Doll Pattern

A few years ago, I discovered the sweetest doll pattern over at girlinspired. Stef of girlinspired created several of the dolls for her daughter’s 7th birthday party. The girls got to mix and match their desired hair colors with the doll bodies, and Stef sewed them up at the party. Ingenious!  You can read more about Stef’s process and download the pattern here.

This simple pattern has become one of my favorite gifts for new babies and birthdays. I’ve used this pattern enough that I eventually made template plastic copies of all of the pattern pieces.

I made the doll in the photo above for the baby daughter of one of my high school friends. Below are photos of some of the other dolls I’ve made from this pattern. I highly recommend this as a fun and confidence-building project for those who have basic sewing skills and are looking for a new challenge!

Hooray for Rain - The Sweetest Doll Pattern
The Sweetest Doll Pattern - Hooray for Rain


DIY Holiday Wreath

For as long as I can remember, Thanksgiving weekend festivities have included construction of a holiday wreath for our parents' front door. My Dad would trim back the Evergreen trees before big wind storms, and didn't want to throw away the perfectly useful limbs. A holiday wreath was the perfect solution. My parents also have a gorgeous and fruitful holly bush that contrasts perfectly with the green limbs.

holly bush.jpg

We've done it in the pouring rain, sunshine, by flashlight in the dark, and every which way in between. This year, we had a surprise snow storm that made our annual project extra festive. We usually have holiday music with the volume up high to cheer us through the frightful weather. If you've never made your own, the process is relatively simple and the end result consistent and classy.

What you'll need...

-Wire Wreath Frame (24 inch for a standard door)
-12-14 Evergreen limbs*
-14-18 limbs of Holly*
-Floral wire
-Battery operated lights, if desired
-Another set of hands (if available)

*If you don't have tree limbs or holly readily available in your yard, many local nurserys carry holly. Christmas Tree Lots often trim the lower tree limbs when they are purchased and may have a stash for a discounted price or for free!

Step 1:

Lay your wire ring flat on a workbench.

Start tucking the limbs underneath the wire cross bars. Ensure the limbs are going the same direction.

Unless you have really lush branches, add a second layer of limbs. This layer does not have to be perfect as it's acting as the base and will be covered by the holly.

Have one person gather the limbs while the other winds a continuous piece of floral wire in a spiral motion.

Voila! -- the base layer is finished...

finished greenery.jpg

If you have a few wisps that didn't make it into the wire, don't hesitate to give your wreath a little haircut.

hair cut.jpg

Step 2:

Start tucking pieces of holly in the wire. Make sure to trim the leaves on both ends so you have nice long stems that are easy to poke under the wire and hold the holly in place.

I like to fasten the holly pieces to the wreath so the berries are really close together and give that gorgeous pop of color around the entire wreath.

Wrap another continuous piece of floral wire in a spiral around the layer of holly. Try to place the wire at the start and end of the sections of berries to avoid knocking too many off. 

Step 3:

We found some battery operated lights majorly marked down during the Thanksgiving sale weekend. If you choose to include lights, make sure to put the battery switch at the bottom of your wreath so it's easy to turn on and off. Getting the lights evenly distributed around the wreath is one of the hardest parts and can take several tries. Our very crafty father folds the light string in half and marks the halfway point with a piece of tape before he starts wrapping. This way, as you wrap the strand around the wreath, you have an idea of how much of the strand you should have already used once you reach the half way point.

Finished Products:

We made wreaths of all different sizes this weekend. Here are more of our final creations...

Jen's wreath:

Plain miniature wreath with holly:

Miniature wreath with lights:

Annual family wreath:

We warmed up our frozen fingers and with a cup of hot chocolate, and leftover whipped cream from our pumpkin pie. Yum!

Happy holiday decorating!

Adventures With Knits

Sewing with knits - Hooray for Rain

I've had a rocky relationship with knit fabrics. About a year ago, I bought some gorgeous knit fabric and set out to make a pilot cap for a friend's kiddo. The pieces of the hat were supposed to be stitched together with a mock overlock or zigzag stitch. It would be an understatement to say it did not go well.  I ended up with a  horrifying crumple of fabric with a stretched out, jaggedy seam. I managed to laugh instead of cry, but it was close!  I tried the hat again a few months later. It went slightly better that time, but still nowhere near the quality that I would feel good about giving as a gift.

I guess hope springs eternal, because I gave knits another try on a small scale this spring when I made a rabbit softie. Sewing knits with a straight stitch went a lot better, so I took on a bigger project with with this receiving blanket.  It was still a simple project to be sure, but this is how we build skills and confidence, right?

I made this 36 inch square receiving blanket for a pregnant coworker who loooves giraffes. I ordered the fabric from Spoonflower. Isn’t it cute?

Organic Knit Receiving Blanket - Hooray for Rain

Spoonflower prints its organic cotton knit in 56 inch widths. I bought a yard and trimmed it to 36 inches square.  Then I used a plate to draw curves over the corners, and cut them down. (As I’ve mentioned a few times before, I am currently loving the look of curved corners.)

Curved corners are especially important for a knit blanket like this one, because it’s bound in double-fold binding, which would not work with traditional square corners. I made the double-fold binding with a stretchy ribbed knit from one of my local fabric stores, Bolt. I cut it into 2 ½ inch widths and stitched them together in one long piece. Then I pressed the long piece in half length-wise, and then opened it back up and folded the raw edges into the middle, pressed it again, and then folded it in half. Then I sandwiched the 36-inch square piece of knit fabric between the two halves of the ribbed binding, pinned it in place, and stitched it in place using coordinating thread.  

I had a significant amount of the giraffe print knit left over, so I bought some terry cloth and made some simple burp cloths to go with the receiving blanket. I took same-sized rectangles of the knit and terry fabrics and sewed around the edges with a half-inch seam allowance, leaving a small gap to turn the fabric right side out. After I turned the fabric out, I top-stitched a quarter of an inch around the edges to finish it off.

Knit Receiving Blanket and Burp Cloth - Hooray for Rain

Last but not least, I bought a super cool board book, Alpha Block, to go with the receiving blanket and burp cloths.

Sewing With Knits - Hooray for Rain

Maybe I'll try that pilot cap again sometime this winter. Third time is bound to be a charm, right?

Brown Paper Packages and Turkey Thumbprints

I cannot tell you how excited I am that it is almost Thanksgiving. Everyone I run into at the coffee stand or the grocery store has been talking about their search for the ultimate Thanksgiving side dish recipe, and whether they'll be going over the river or through the woods to their annual family gathering. There is definitely a feeling of excitement in the air. The night before Thanksgiving, I always watch Planes, Trains & Automobiles while peeling potatoes. Any year Jen and I are able to be together on Thanksgiving, we get up by 9:00 am to watch every single jaw-dropping, boy band singing, high school marching-band minute of the Macy's Thanksgiving Day Parade. Yes, we are still 5 years old at heart. One year, we're hoping to make it to the parade in person, but one balloon vacation was enough for 2014.

We won't be able to celebrate with my cousins and their kiddos (age 3 and 5) this year, so I wanted to do something special by mail to get them excited for the upcoming holiday festivities. I have a small collection of holiday books given to me by aunts and uncles and grandparents over the years that I've cherished, and wanted to pass on the tradition. I found a few adorable Thanksgiving books, and made my own Thanksgiving wrapping paper with brown craft paper, stamp ink, and my hand.

brown paper packages 3.jpg

Both of these sweet kids are also into crafts. I made up small craft kits with the supplies for two fun projects I found on Pinterest. The first kit was for Leaf Turkeys. We recently had a pretty big wind storm, followed by a freeze, so there weren't any beautiful natural leaves readily available. I chose to go with some fabric leaves and improvised with pipe cleaner legs.

The second craft, meant for the 5 year old, was for Cork Turkey Place Cards.

In my search for turkey crafts, I also saw these adorable thumbprint turkeys on Pinterest and couldn't resist recreating them for my Thanksgiving cards this year.

Jen always recites this to me, and it makes me laugh, so I thought you'd like it too:

"If turkeys thought, they'd run away, a week before Thanksgiving Day, but turkeys can't anticipate, and so there's turkey on my plate." - Jack Prelutsky

Happy Thanksgiving!