Flying Geese Baby Quilt

Hooray for Rain - Flying Geese Baby Quilt

Each time I make a quilt I learn something. Usually it's a new or at least improved quilting skill. This time, the lesson was that I should trust my instincts!

Earlier this summer, our cute next door neighbors Seth and Leigh were pregnant with their second child. They waited until the birth to find out if they are having a boy or a girl...or, in other words, they have much more patience and self-control than I will ever have.

I wanted to make a baby quilt for their new kiddo, and I certainly could have made a very gender-neutral quilt, but I wasn’t really feeling it, and neither was my fabric stash. My gut told me they were going to have a girl. I was about 75% done with the quilt when I ran into Seth while out for a walk in the neighborhood, and he mentioned that most everyone was predicting that Leigh would have a boy based on the way she was carrying the baby. With less than two weeks until their due date I switched gears and stared this quilt…a very blue quilt.

What do you know, the day after I finished the quilt, Leigh had a perfect baby girl!

I could have given them this quilt anyway. I love blue and certainly think that little girls can love blue as well as any other color, and boys can love pink and every other color. Ultimately I decided to save this quilt for another baby, mainly because I was struck with inspiration to make complimentary quilts for the new baby, as well as her older sister.  

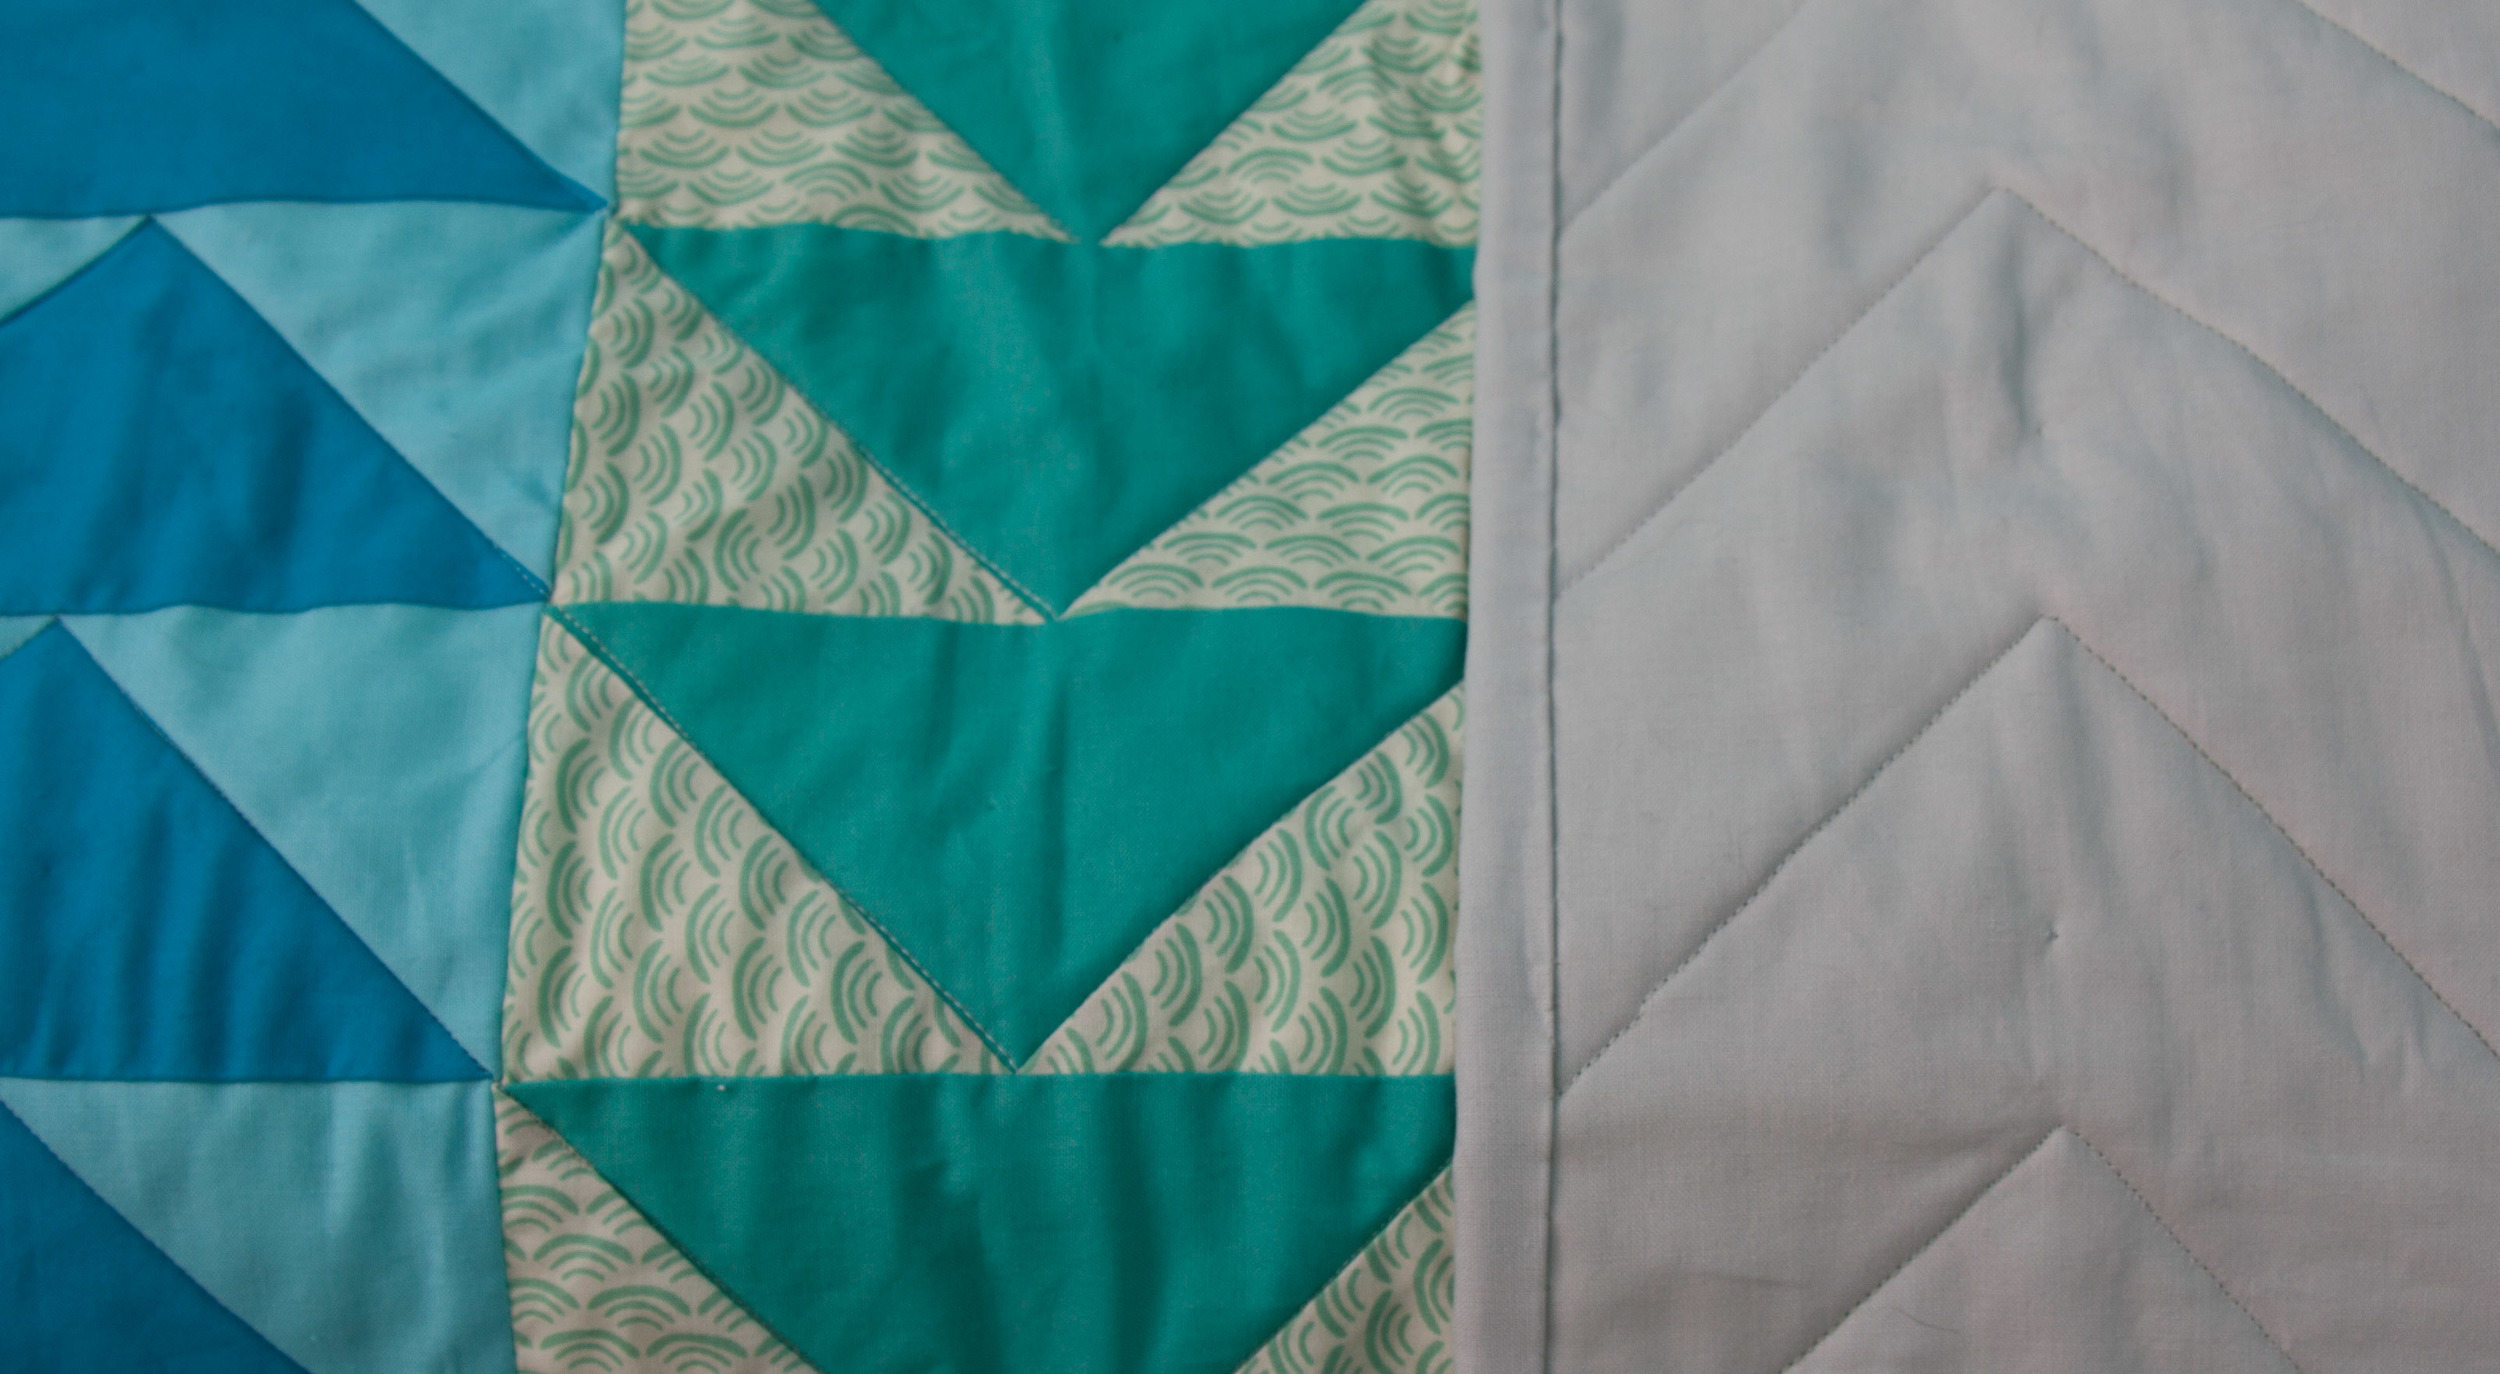
Maybe it was good that I didn't trust my instincts. It was fun to make flying geese again, and it feels nice to have this quilt in the bank.

Hooray for Rain - Flying Geese Quilt #flyinggeesequilt
Hooray for Rain - Flying Geese Quilt

I thought about quilting it with vertical lines but ultimately decided on chevrons.

Hooray for Rain - Flying Geese Quilt

Here’s one last picture that I took after I washed it. I love the ruffled, cuddly look of a quilt after it’s been washed.

Hooray for Rain - Flying Geese Quilt

Scraps for September

Have you heard of Scrap? I drove down to visit Jen last weekend, and she introduced me to this fabulous shop in Portland that sells reused creative materials. They have bins and bins of every possible material you could think of --- buttons, googly eyes, Easter eggs, wood scraps, crayons, paint, markers, rubber stamps, highlighters, playing cards, stickers, greeting cards, magazines, wrapping paper, journals, and many other things I can't even begin to remember. The products are in good condition and very reasonably priced. I love that the crayons are sold by the handful. You have to have patience to dig through the bins for the ultimate find, but it is well worth it! I love how Scrap is reducing waste, and that you never know what you'll discover.

Hunting for a treasure!

Hunting for a treasure!

My favorite discoveries included ten holiday Martha Stewart Magazines for $2.00, rubber stamps for $2.00 or under, and greeting cards that were 10 cents each with 5 cent envelopes. The card and envelope selections were impressive.

I'm also very excited about these...

I'm so excited to get started on some new projects with the supplies I found at Scrap. Be sure to check it out if you're ever in Portland.

California Dreaming

sealbeach.jpg

In mid-August Patrick and I took a week off and had a summer vaycay! It was glorious. We spent the first half of the week in LA visiting my dear college friends Heidi and Amy, and the second half of the week in San Diego.

We did so many fun things!

Heidi and another friend, Andrea, did an open water swimming race, and we got to go cheer them on! It was a nice throwback to our old swim team days. They both did great! In fact, Heidi won her age group, beating out a former Olympian! What a badass.

Heidi, Amy and Dre

Heidi, Amy and Dre

That evening we went to the Hollywood Bowl to see Iron and Wine, the Head and the Heart, and Glen Hansard. Wow, the Hollywood Bowl just might be my favorite place to see a show. The Hollywood Bowl’s beauty and acoustics are unrivaled, and possibly best of all, they let you bring in your own food and drinks. Our friends put together an amazing picnic, and we enjoyed great music as the sun set and the Super Moon rose over Los Angeles.

Jen, Sam Beam and Amy
Patrick and Jen
Hollywood Bowl

The next day we went downtown and ate lunch at the newly revitalized Grand Central Market, which is one part farmer’s market, one part fabulous restaurant row. Patrick and I both selected plates from DTLA, specializing in cheese and salads. Our lunches were delicious (not that you could ever go wrong with burrata cheese), but Heidi and Amy were was the big lunch winners. Heidi got a brisket plate from Horse Thief BBQ. She graciously let me have a bite, and it was the best brisket OF MY LIFE! Amy got the daily curry from Sticky Rice, and it was also mind blowingly delicious!

DTLA
DTLA

We went on a little walk after lunch over to The Last Bookstore, which was such a unique space. The main level was normal bookstore, but the upstairs was a “labyrinth” with a book tunnel, a book wall with a window, other fun displays, and artists’ studios.

The Last Bookstore
The Last Bookstore
Heidi and Amy

My favorite part was that they organized their used books by color!

The Last Bookstore
The Last Bookstore
The Last Bookstore

That night, Amy and her fiancé Brad had us over for Brad’s famous tri tip. Patrick made Manhattans, and we sat in the backyard and talked and laughed until dark. Good friends.

Amy and Brad

Our last day in LA, Heidi took us on a nice bike ride from Huntington Beach to Newport Beach and back. After our ride we treated ourselves to waffle sandwiches, which were completely delicious!

Jen and Heidi

Afterwards we went to Venice, or as Heidi calls it, “the Portland of LA”…very true!

Venice
Venice

As we left for San Diego, we were so sad to say goodbye to our friends, but also so happy that vacation was not over yet.

We checked out nearly all of the San Diego beaches, and concluded that Coronado Beach was our favorite relaxation spot. Sparkling beach, beautiful historical hotel, tropical drinks, completely idyllic.

Coronado
Hotel del Coronado

We also had a fabulous anniversary dinner at a newish restaurant, Juniper & Ivy. One of my favorite parts of Juniper & Ivy was the open kitchen. It was fun to see how well the crew worked together.

The next morning we drove up to La Jolla to go sea kayaking. Unfortunately the water was too rough to go into the La Jolla caves (or take any pictures!) but we still had fun.

That night we found an excellent speakeasy-style cocktail bar called Noble Experiment. It’s sneakily hidden in plain sight, so feel free to email me if you’d like directions on how to find it. The bartender, Megan, was top-notch and also incredibly nice.  

On our final day, we took time to explore the parts of Balboa Park surrounding El Prado. The architecture and gardens were both so lovely.  

Balboa Park
Balboa Park

We spent our last hour before heading to the airport at Queenstown Public House in Little Italy. The space was light and airy, the food was excellent, and I could have happily spent more time there!

Queenstown Public House

Alas, it was time to head home. We’ll be dreaming of you until next time, California!

Although my last few blog posts haven’t reflected it, I have been sewing quite a bit. I’ll have a new quilt to show you in my next post!

Get Well Banner

Recovering from an illness or injury is downright miserable and lonely. The other day, I was looking through an old box and found a sweet get well card, full of crayon drawings of balloons and flowers made by one of Jen's best friends. I had been cooped up for a week with bronchitis in elementary school, and her simple gesture was so meaningful and such a surprise. It's the little things that make you feel better when you're gaining back your strength.

I have a coworker who recently broke her leg, and is very allergic to flowers. Inspired by the many adorable band-aid cards on Pinterest, here was my alternative to a cheerful bouquet...

I started with five 2 inch x 2 inch blue squares. I used the small, dot band aid packaging for the beginning and end of the banner. I secured each square to the next with the adhesive ends of small band aids, and spelled out the message with scrapbook stickers. I spiced up my band-aid friends with some googly eyes and a heart sticker, and finished my banner with baker's twine and red pom poms.

banner2.jpg

I hope this helps to brighten her spirits!

Cyanotype Sun Prints


Hooray for Rain - Cyanotype Sun Prints

Blue has been my favorite color for years and years. I love every shade – pale blue, deep sea blue, and everything in between. At least half of my fabric stash is blue. Naturally, I could not RESIST cyanotype prints, more commonly known today as sun prints, when I first discovered them in an art supply store.

Cyanotype is a photography process that was discovered in the 1800’s. Cyanotype paper is made light sensitive with potassium ferricyanide and ferric ammonium citrate. Some people treat paper or fabric themselves with the chemicals. As a beginner, I happily bought a kit at the art store.

Before you start, you’ll want to gather your objects to place on the light sensitive paper. Pick interesting objects with strong silhouettes. Leaves and flowers work well, but you may find other objects around the house with interesting shapes. I grabbed some laser cut felt dahlia earrings and some felt flower wine glass markers, and both worked well.

Because the paper is light sensitive, you must take the sun print paper out of the envelope inside or in minimal indirect natural light. The paper is medium blue. Arrange your objects on one or two of the sheets, and put them outside in direct sunlight. I arranged my paper and objects on a cookie sheet for ease of transporting into the direct light.

Hooray for Rain - Preparing Sun Prints

Leave your sun prints and objects in direct sunlight for about one minute. The exposed parts of the paper will fade to a very pale blue, which is how you know they are done.

Hooray for Rain - Sun Prints in the Sun

When you remove the objects, there will be medium blue shadows where the objects were.

Hooray for Rain - Sun Prints After Exposure

Rinse the paper in water. I used a second rimmed cookie sheet with water in it. Once rinsed in water, the exposed areas will turn blue again, and the areas shadowed by your objects will turn white. It’s a neat effect.

Hooray for Rain - Sun Prints After Water Bath

Place your finished sun prints somewhere flat to dry. I placed rocks on mine to keep them from blowing around. The blue areas will begin to darken immediately. Once your sun prints have dried, place them under a heavy book overnight to flatten. They will continue to deepen in contrast overnight. Such a pretty deep blue!

Consider your objects and whether they would look better exposed to sunlight directly overhead, or angled sunlight, which could create shadows depending on the shapes of your objects.

Here is a sun print that was exposed in mid-day sunlight. I love the effect of my quilting ruler layered over the fern.

Hooray for Rain - Fern Ruler Cyanotype

This one, done in late afternoon sunlight with poppies, turned out pretty cool too. You can see the shadows cast by the poppy petals in a lighter blue above the white flower silhouettes.

Hooray for Rain - Poppy Cyanotype

Here’s a collection of a few of my favorites. Clockwise from the top left, they are:

1) lupine

2) billy buttons

3) ginkgo (center) and candytuft leaves (outer)

4) California poppies

5) fern and quilting ruler and

6) leek allium

Hooray for Rain - Cyanotype Sun Prints

I had a great first experience with cyanotype, and I’d recommend the craft for kids and adults alike!

Now I can’t stop thinking about cyanotype fabric…