Easter Bunny Tutorial
Little bunnies are multiplying in my craft room! In preparation for Easter I have been making bunnies for some of the kiddos in my life. This attachment has all of the template pieces needed to make a bunny of your own. This pattern is a tweaked version of my rabbit softie pattern, which makes a shorter, chubbier bunny.
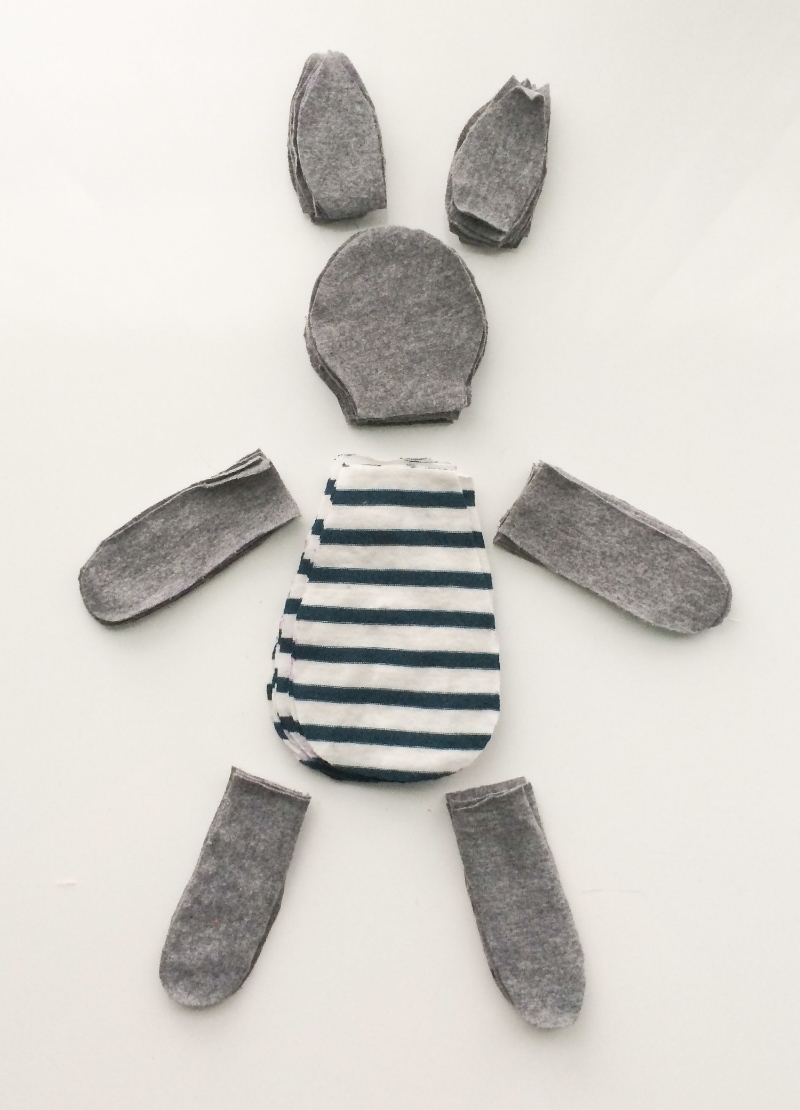
First things first, I cut all my pattern pieces out. I traced the templates onto my fabric with a disappearing ink pen. I also tried tracing with chalk and my Frixion pen, but due to the stretchiness of the jersey, the disappearing ink pen worked best. I traced and cut out the following pieces:
- two head pieces
- four ear pieces
- two body pieces
- four arm pieces
- four leg pieces
The first pieces I sewed together are the ears. I sewed two pieces together with a scant quarter-inch seam, turned them right side in, and then topstitched an eighth of an inch or less from the edges.
Then, in preparation for embroidering the rabbit's face, I sewed the ears on to one of the head pieces, aligning the base of the ears with the top of the front of the face, and taking just a few stitches to hold them in place. Then I drew on the face with the disappearing ink pen, and embroidered the face.
Next, I sewed the arms and legs together, leaving the base of each appendage open. I use the same pattern piece for the arms and the legs. Here's one of the arm/leg pieces in all the stages from cut pattern pieces to stuffed arm/leg.
Then I attached the body pieces to the head pieces.
Then it was time to tack the arms and legs in place. I made sure to position the arms and legs facing in on top of the body when lining up the arm/leg raw edges with the raw edge of the body. Otherwise, when I turned your rabbit right side out, the arms and legs would have been facing the wrong way.
Then I sewed the head pieces together, right sides facing each other, and ears tucked in. I started and stopped stitching at the head/body junctions.
Next I tucked the arms in. I sewed from the head/body junction down just past the armpit of one arm. Then I switched over to the other side of the body, and stitched from the head/body junction down the side. When I got near the bottom of the body, I stuffed the legs inside the body, then stitched around the bottom of the body past both legs. I left an opening between the leg and the armpit to turn the bunny right side out.
Side note...when my dear sister Lauren proofread this post, she compared me to a serial killer for talking about turning poor little bunnies inside out.
Seriously guys, I swear I'm not a serial killer of anything. I don't even like to kill real live spiders. I'm just a...serial bunny maker? I've got about 6 of these little guys going right now.
Serial killer comparisons aside, the next thing I did was turn and stuff the bunny. The last step is to sew up the opening. I like to use a ladder stitch.
Hooray, you have one pint-sized Easter Bunny!


