Cyanotype Sun Prints


Hooray for Rain - Cyanotype Sun Prints

Blue has been my favorite color for years and years. I love every shade – pale blue, deep sea blue, and everything in between. At least half of my fabric stash is blue. Naturally, I could not RESIST cyanotype prints, more commonly known today as sun prints, when I first discovered them in an art supply store.

Cyanotype is a photography process that was discovered in the 1800’s. Cyanotype paper is made light sensitive with potassium ferricyanide and ferric ammonium citrate. Some people treat paper or fabric themselves with the chemicals. As a beginner, I happily bought a kit at the art store.

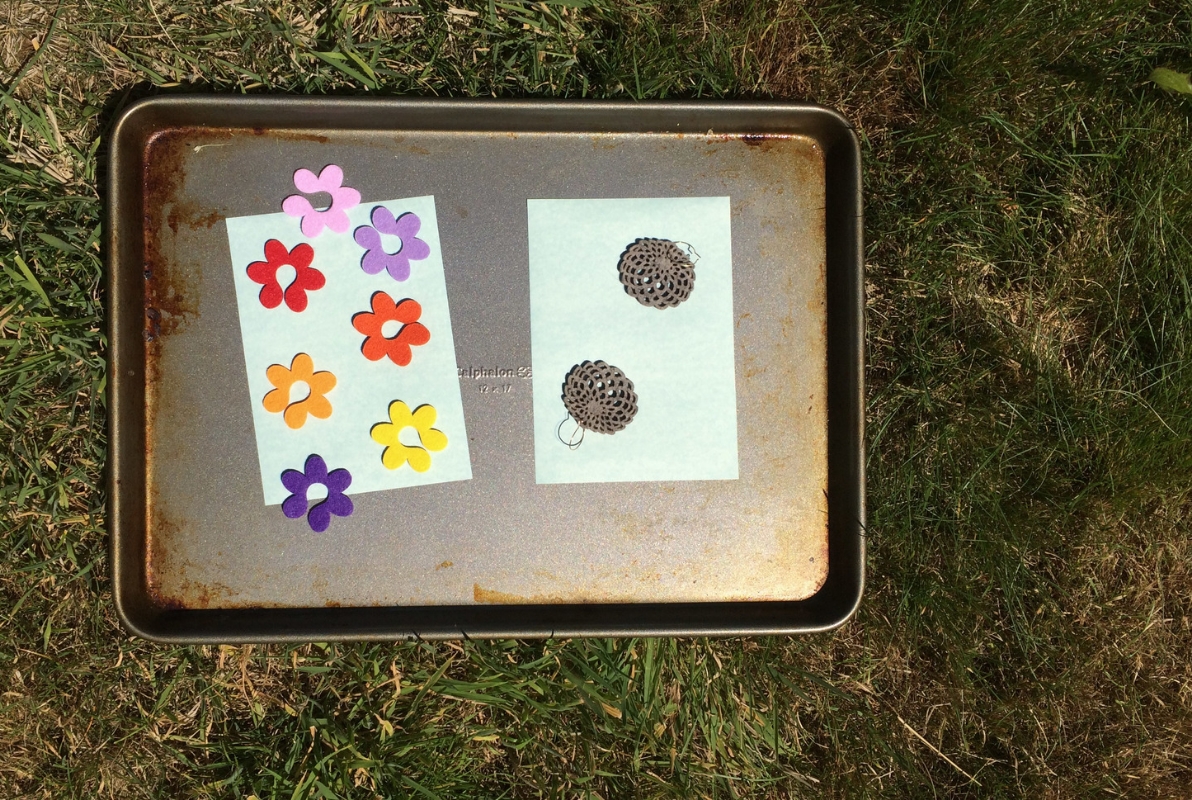
Before you start, you’ll want to gather your objects to place on the light sensitive paper. Pick interesting objects with strong silhouettes. Leaves and flowers work well, but you may find other objects around the house with interesting shapes. I grabbed some laser cut felt dahlia earrings and some felt flower wine glass markers, and both worked well.

Because the paper is light sensitive, you must take the sun print paper out of the envelope inside or in minimal indirect natural light. The paper is medium blue. Arrange your objects on one or two of the sheets, and put them outside in direct sunlight. I arranged my paper and objects on a cookie sheet for ease of transporting into the direct light.

Hooray for Rain - Preparing Sun Prints

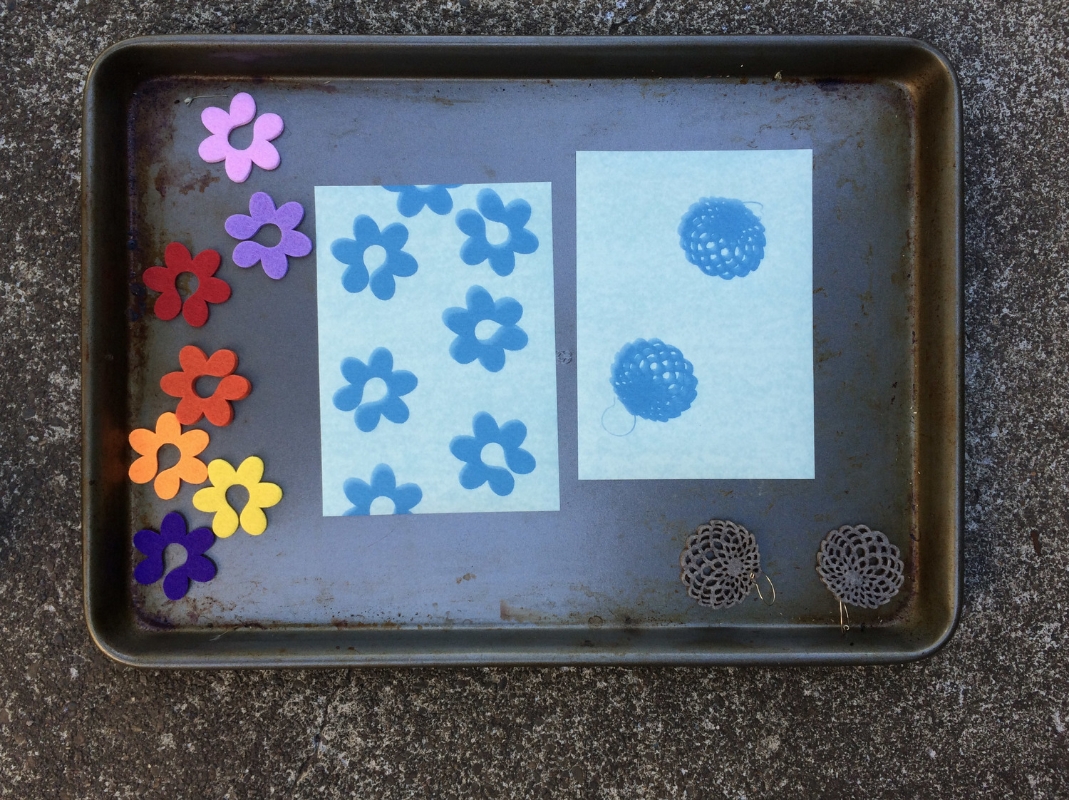
Leave your sun prints and objects in direct sunlight for about one minute. The exposed parts of the paper will fade to a very pale blue, which is how you know they are done.

Hooray for Rain - Sun Prints in the Sun

When you remove the objects, there will be medium blue shadows where the objects were.

Hooray for Rain - Sun Prints After Exposure

Rinse the paper in water. I used a second rimmed cookie sheet with water in it. Once rinsed in water, the exposed areas will turn blue again, and the areas shadowed by your objects will turn white. It’s a neat effect.

Hooray for Rain - Sun Prints After Water Bath

Place your finished sun prints somewhere flat to dry. I placed rocks on mine to keep them from blowing around. The blue areas will begin to darken immediately. Once your sun prints have dried, place them under a heavy book overnight to flatten. They will continue to deepen in contrast overnight. Such a pretty deep blue!

Consider your objects and whether they would look better exposed to sunlight directly overhead, or angled sunlight, which could create shadows depending on the shapes of your objects.

Here is a sun print that was exposed in mid-day sunlight. I love the effect of my quilting ruler layered over the fern.

Hooray for Rain - Fern Ruler Cyanotype

This one, done in late afternoon sunlight with poppies, turned out pretty cool too. You can see the shadows cast by the poppy petals in a lighter blue above the white flower silhouettes.

Hooray for Rain - Poppy Cyanotype

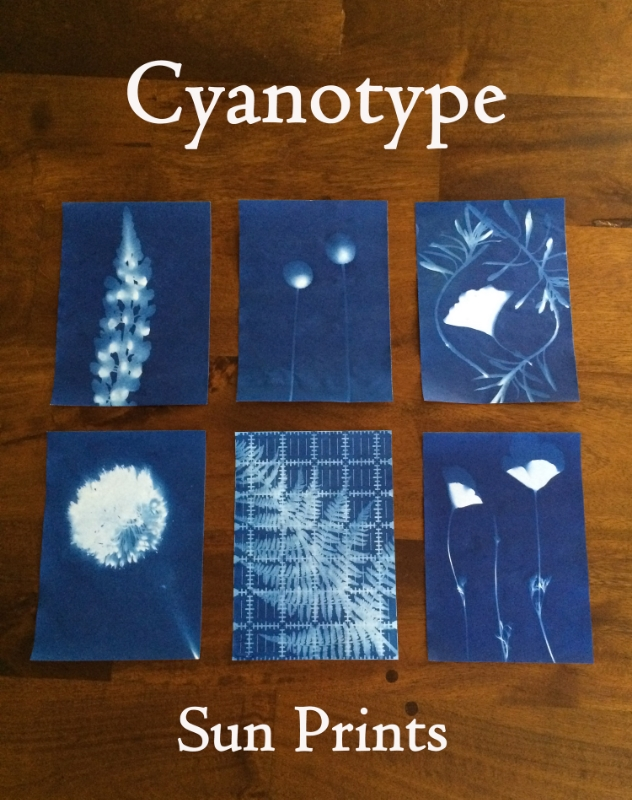
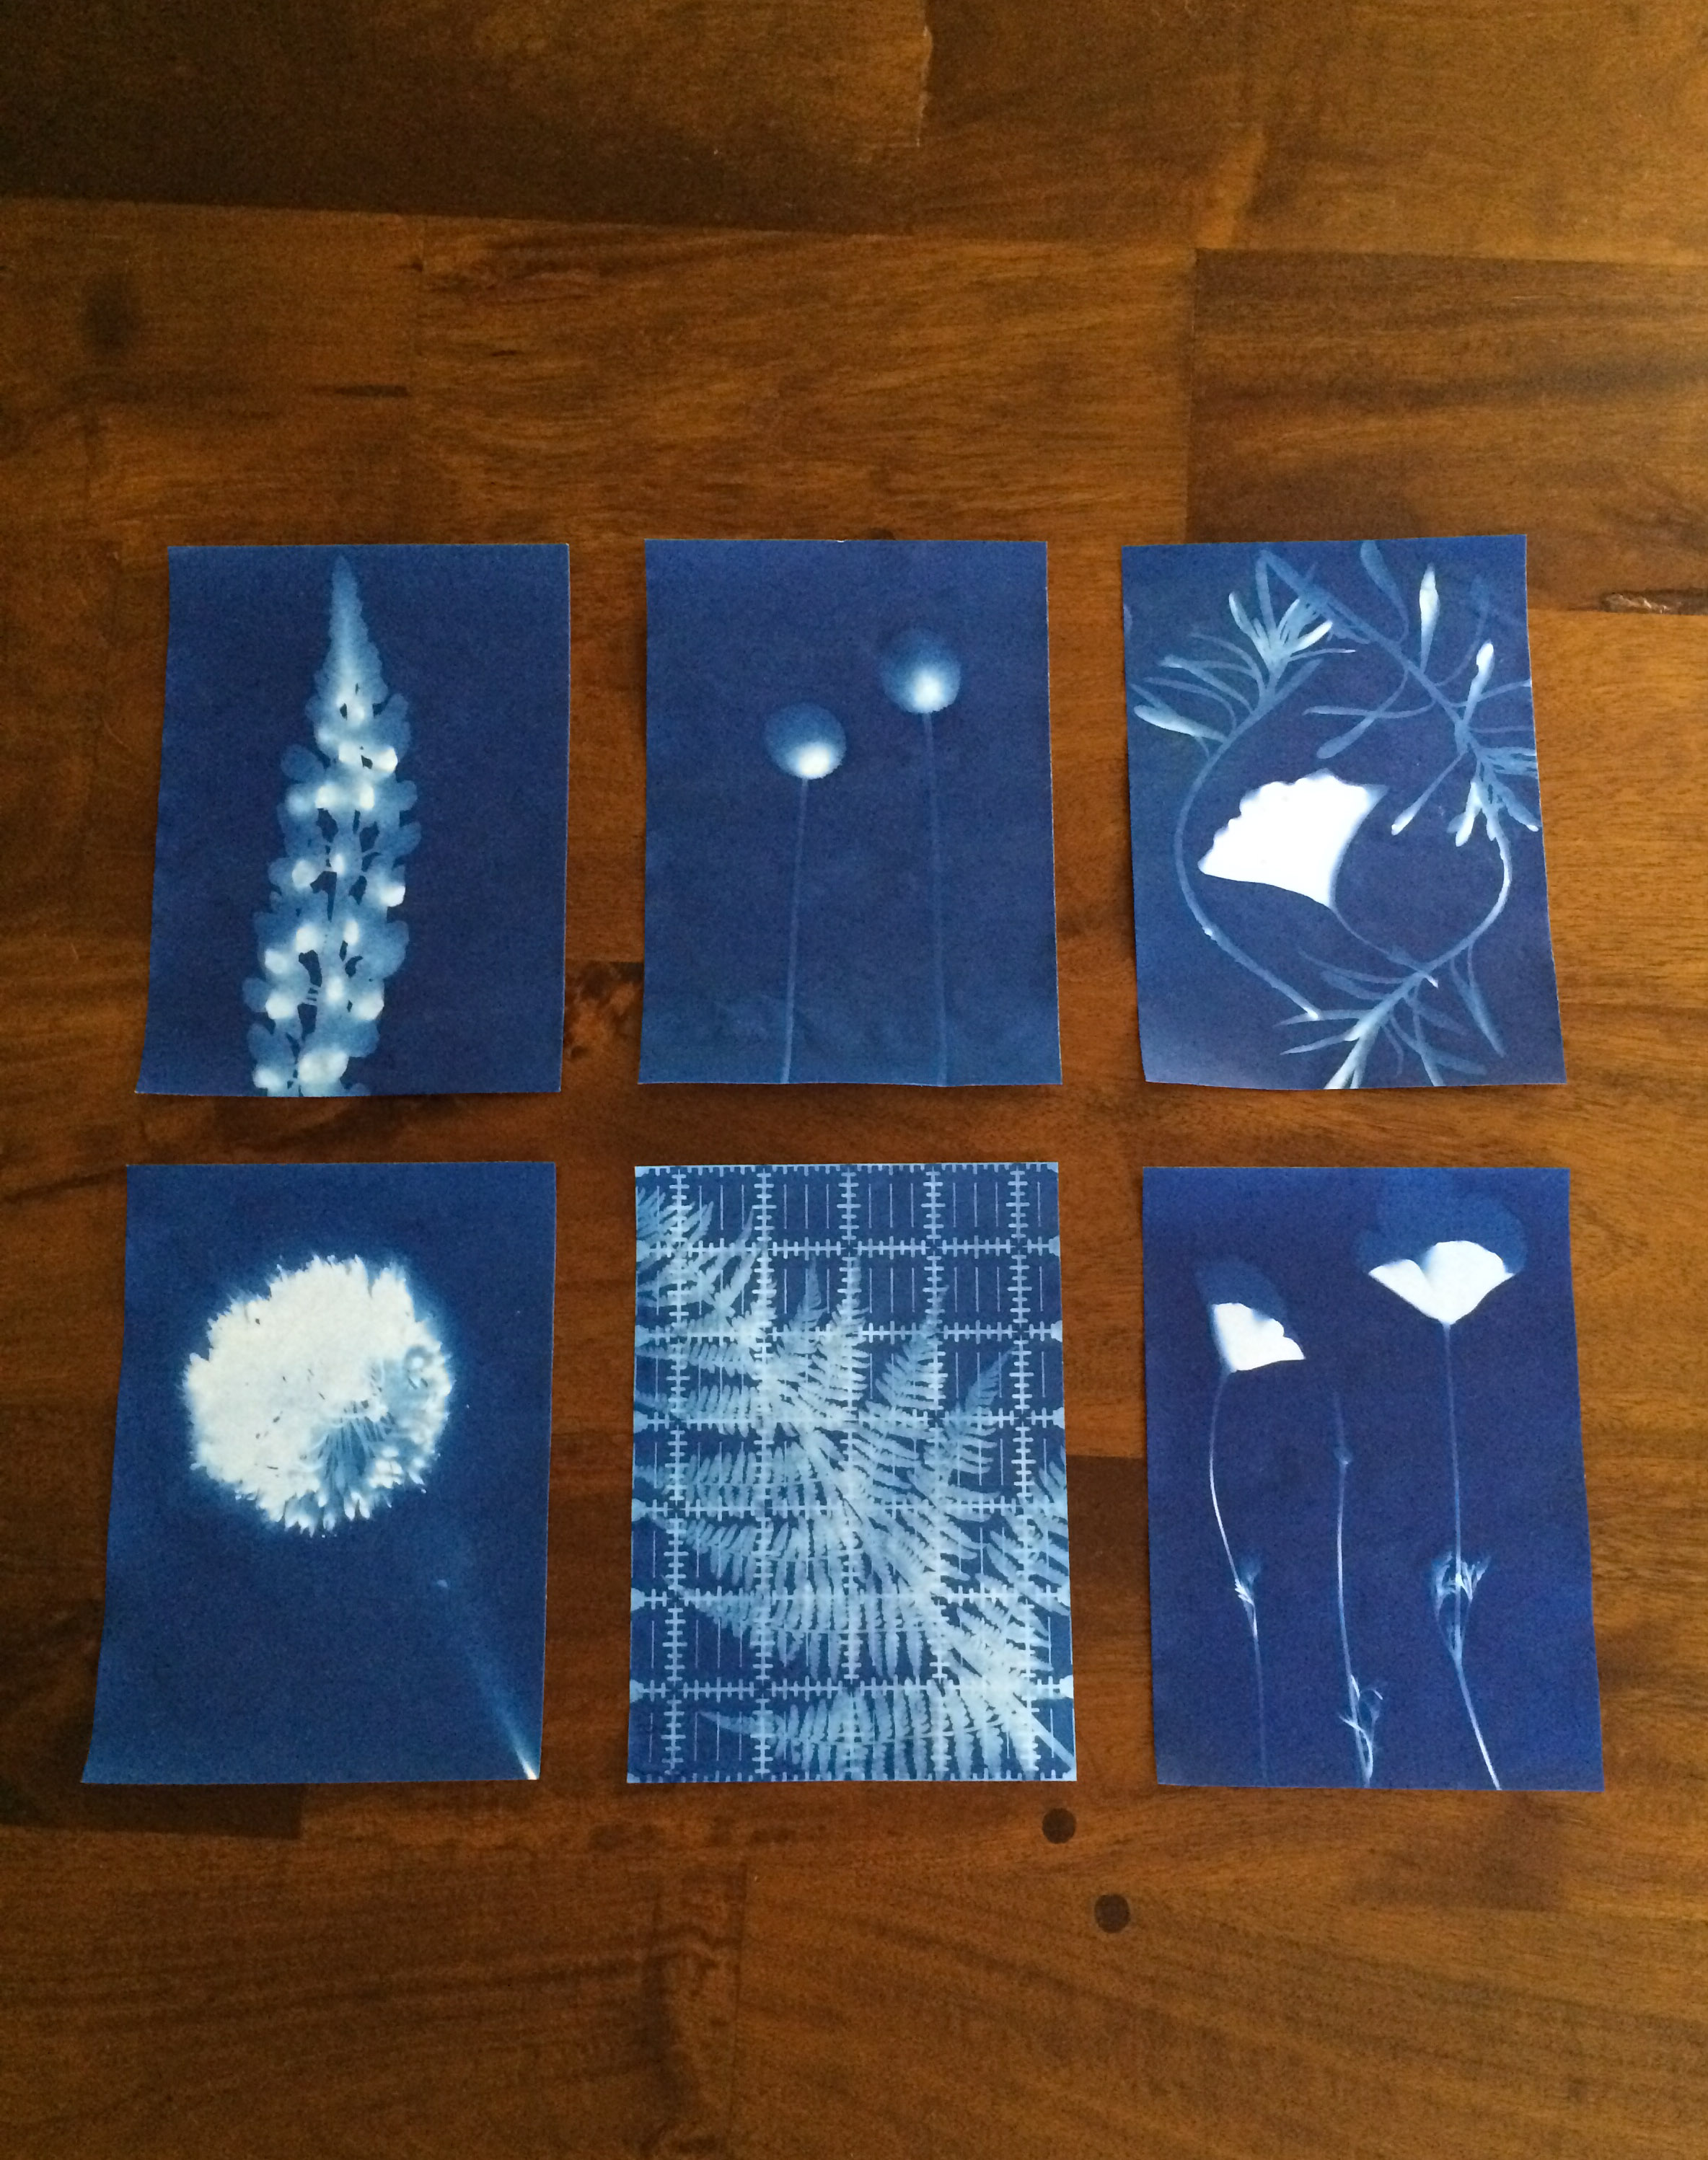
Here’s a collection of a few of my favorites. Clockwise from the top left, they are:

1) lupine

2) billy buttons

3) ginkgo (center) and candytuft leaves (outer)

4) California poppies

5) fern and quilting ruler and

6) leek allium

Hooray for Rain - Cyanotype Sun Prints

I had a great first experience with cyanotype, and I’d recommend the craft for kids and adults alike!

Now I can’t stop thinking about cyanotype fabric…

Birthday Greetings

I adore any opportunity to send or receive any kind of snail mail, especially birthday mail. My mother is the Martha Stewart of remembering and recognizing birthdays, and I'm trying to follow closely in her footsteps. I've been getting tired of the birthday card options at my favorite card stores, and wanted to do something different. My good friend Kelsey celebrated her birthday at the end of July, and I decided to mail her this cheery birthday sign, again inspired by The Paper Mama.

I started with an array of patterned paper, and punched 2 inch circles for my sign.

birthday16.jpg
birthday9.jpg

I used stick-on scrapbook letters to speed up the process.

Recently I ordered a 5 lb package of multicolored pom-poms and have been trying to find ways to utilize them. I've seen a variety of these adorable ice cream cones on Pinterest, and thought they would dress up my sign.

I started with one of my favorite craft supplies -- a toilet paper tube. I unrolled it, and punched a 2 inch circle from it.

I cut the circle into uneven quarters, and rolled and hot glued them to make the cones.

Next, I hot-glued my pom-poms onto the cone to make a double scoop. I used the ice cream cones as spacers between the words. I punched each circle at the top, and threaded the sign with blue baker's twine. I folded the sign into an accordion, put it in a small box, and mailed it off to hopefully, brighten her day!

Bridal Shower in a Box

Boy is it wedding season. I've had a handful of college friends tying the knot this summer, and I haven't been able to attend all of the grand festivities. To honor one of my dear friends, I compiled the bridal shower essentials, and a fun surprise, and mailed the goodies off to arrive a few days before her shower.

Her wedding invitation was a gorgeous combination of melon and sky blue, and I used these colors as inspiration for the hand-made portion of the box. I adore the signs by The Paper Mama, and wanted to make my own version that my friend could use as a decoration at her shower. Here is the finished product.

I chose to make my letter squares 3.5 inches by 3.5 inches because the box meant to hold the sign was 4 x 4 inches. I cut out 11 squares in the sky blue paper and set them aside.

Next, I spelled out the letters in a word document, and experimented with the font size to fit them to the blue squares. Then I cut out the black letter outline and traced them onto the melon colored paper. Having stencils would work well, and save time.

Once the letters were cut out of the melon paper, I attached them to the blue squares with a glue stick. For the ampersand, I chose to use an X-Acto knife rather than scissors. I also used the melon-colored paper to make two large hearts for the beginning and end of the sign. I used a mini hole punch in the upper right and left corners of each square, and threaded blue and white striped baking twine.

sign half done.jpg

Finally, I attached the hearts to the edges of the twine with scotch tape.

I secured the completed sign in a box, taping the first heart to the box top, so the sign could be easily removed without becoming tangled.

sign in box.jpg

I also chose to include a gift card to one of her registry sites, a set of thank you notes, nail polish, and a mini emergency kit with mints, deodorant, a first aid kit, and a few travel size medications.

I wrapped everything in tissue the same color as her invitation, and sent it off with a note on the box to open before the shower.

It was fun to make, and a nice way to celebrate with her from afar!

A Happy Rainbow Children's Apron and a Curves Tutorial

Several years ago I took a break from quilts and became consumed with making aprons for a time. I made quite a few Emmeline aprons for various friends and family that year, including my friend Jodi. These days Jodi has a 5-year-old daughter K, who likes to wear Jodi’s apron whenever she helps with baking or frosting cookies, even though the apron is more than a few sizes too large!

After seeing adorable pictures of K practically swimming in Jodi's apron, I decided it was time that K had her own apron. The kid loooves rainbows, so that was a must. I went looking and quickly found Wonder Rainbows by Ann Kelle, which is just so cheerful and happy. The sweet pattern and vibrant colors make me feel nostalgic for my own childhood.

Hooray for Rain - Ann Kelle Wonder Rainbows

I wasn’t exactly sure how to size an apron for a 5 year old. I wanted to leave a little room to grow, and most of the patterns that I found for reference were geared towards 3-6 year-olds. I took a stab at sizing the apron up, and luckily it worked out just fine!

I decided to make K’s apron reversible, much like the Emmeline. I paired the Wonder Rainbows skirt with a Wee Wander Summer Night Lights panel by Sarah Jane for the bodice on one side.

Hooray for Rain - Wonder Rainbows and Wee Wander

On the other, I paired the Wonder Rainbows bodice with a skirt made of curved Kona solids, mimicking the Wonder Rainbows fabric. It’s been a few months since I sewed curves and it reminded me how much I love it!  

Hooray for Rain - Wonder Rainbows and Pieced Curves

I drew the curves on a piece of freezer paper cut to the size of the apron skirt.

Hooray for Rain - freezer paper curves

Then I cut out the curves, ironed them onto the fabric and cut them out, leaving a quarter-inch seam allowance.

Hooray for Rain - Quarter Inch Seam Allowance
Hooray for Rain - Prepped Curves

When you sew two curved pieces together, this is how you line them up. It felt counterintuitive when I was learning, but after I did it a few times it clicked.

Hooray for Rain - sewing curves together

When you start sewing, you want to keep the bottom piece lined up straight so that the fabric is parallel to your presser foot. Be careful not to tug too hard and stretch out the bias. You hold the top piece up so you can see what you’re doing while you keep the top and bottom edges lined up under the presser foot.

Hooray for Rain - Stitching Curves

Curves really are super fun. I highly recommend giving it a try if you are looking for a new challenge.

After sewing the apron pieces together I finished it off with some topstitching around the edges.

Hooray for Rain - Finished Apron Skirt

And this, of course, happened mid-project when I was trying to get some pictures. Oh kitty, you attention hog.

Last time I went on an apron making spree, I didn't quite finish all the aprons I had planned for my family and friends. Hopefully this is just the start of apron spree number 2!

Hooray for Rain - Finished Apron

Uncle Sam wants you...to have a Happy Fourth of July

I love Independence Day, not only for all that it represents, but also because it has always been my first official taste of summer. As a kid, there was no better feeling than running happily through the back yard, smelling the burgers sizzling on the grill, playing with my friends, and begging for the box of sparklers to finally be opened. In preparing for my own Fourth of July festivities, I was inspired to make this Uncle Sam decoration out of one of my favorite craft supplies---a simple toilet paper roll.

You can access the template for everything you need to make your own Uncle Sam here.


Supplies:

-Toilet paper tube or paper towel tube

-Paper (Red, Blue, White & Pink)

-Scissors or a paper cutter

-Hot glue gun or tape

-Markers

-3 small pom poms or cotton balls

-Small star punch or stencil


I started with Uncle Sam's hat. There are four components -- the hat top, hat brim, hat body, and star trim. The hat top and brim can easily be traced onto your paper of choice. For the hat body, you can trace the template shape onto red or white paper. Cut out and attach small strips of the opposite color making a striped pattern. I used an adhesive paper for my strips, and it made assembly really easy. For the star trim, I used a star punch on white adhesive paper to make my own star stickers, and applied them to the royal blue paper.

I first secured the hat body, using my glue gun, about 1/4 inch from the top of the tube to help with proportions. Then I pulled the hat brim over the paper tube. It should stay on the tube by itself without any glue or tape. Next, I attached the star trim just above the hat brim with my glue gun. Finally, I attached the top. All you need is patience and a lot of tape. Another set of hands helps, too.

Next, I sketched the eyes and smile on my pink adhesive paper. My punch for the stars included a crescent moon shape. I trimmed down two of the moon punches to make Uncle Sam's eyebrows. I secured the face with my hot glue gun, and then attached the pom poms directly to the paper tube.

After the face was complete, I cut out two squares of white paper, and added small slices to give texture. You can fold alternating pieces of the strips, or curl them with scissors like grosgrain ribbon to give him more personality. Secure the hair just below the hat brim.

hair.jpeg

Next I assembled his shirt. I started with a square of blue paper, and secured it with my glue gun just below the face. I traced the bow-tie in red paper, and attached it just below the beard. To make the lapels, I made two rectangles of red and white striped pieces, trimmed them into triangles, and added a curve at the top. There is lots of liberty with paper color and lapel shape in this step. I also attached the lapels with my glue gun.

Finally, I used a large piece of red paper, and smaller strips of white adhesive paper to make the pants. I secured them just below the blue shirt, and they extended about an inch below the edge of the tube.

Uncle Sam and I wish you the happiest Fourth of July!!!

final.jpeg